by Steve Cunningham
It’s only been about a year and a half since we last looked at Sony’s Vegas Pro 7 audio (and video) editor (see the April 2007 issue of RAP). I usually avoid re-reviewing a piece of software that quickly, particularly since the past few updates to this venerable program have seemed juicier on the video side than on the audio side. But while I wasn’t looking, Sony added something that has been missing for years to what has always been a competent and friendly audio editor.
Vegas now has a mixer.
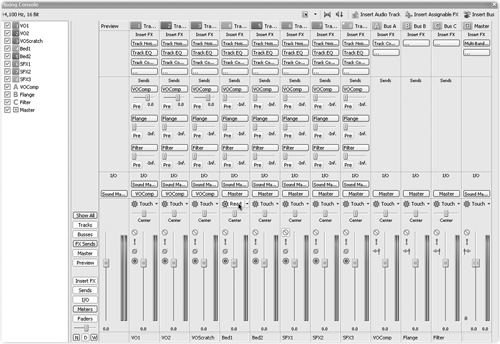
Wait, I know, it’s had a mixer all along, but the most important mixing elements like faders and mutes were integrated into the Track display, and the less-important, but no less useful, elements lived in their own separate Mixer window. That never cut it for me. No, I’m talking a real mixer, that looks and operates like an analog mixer with faders and knobs. You remember those, don’t you? Vegas 8’s new Mixing Console window has all the parameters you’d expect to see, organized into one window so it’s all visible simultaneously. So you can set up and perform an actual mix without guessing, right?
NEW REQUIREMENTS
First, it’s not all beer and skittles in the requirements department if you use an older version of Windows. Vegas 8 now requires Windows XP with Service Pack 2 at a minimum, which means it’ll no longer support Windows 2000 or a non-upgraded version of XP. But it also supports Vista, which should make somebody somewhere happy (I just don’t know who). I’m still not ready to take that particular plunge, nor are most people I know who cut audio for a living on Windows. But Microsoft doesn’t sell XP at retail anymore, and eventually we’re all going to have to go there, so I suppose it’s a good thing that Vegas is ready for it even if I’m not. Actually, the same goes for XP Service Pack 3; I heard enough horror stories about audio problems with SP3 that thus far I’ve managed to avoid it, and none of my appendages have fallen off. Yet.
Otherwise the requirements are still about the same as they were for version 7. Vegas needs a minimum 1GHz processor, although 2.8GHz is recommended for video stuff, a gigabyte of RAM and about 200MB of disk space, and Microsoft’s .NET Framework 3.0, which is included. Fine and dandy there. In total, the requirements are not serious for audio editors — after all, this is a program that is designed first and foremost to cut video (and HD video at that), so since all we’re doing is cutting a bit of little old audio, we should do just fine.
If you buy the software from Sony’s website you can choose to buy physical media or a download version of the product. As an impatient guy I always opt for the downloadable version, which also feeds the cheapskate in me by being about fifteen bucks cheaper. Assuming you do the same, you might as well download the free and updated Sony Media Manager software package at the same time, and install it as well (Media Manager improvements are discussed below). You’ll also have an opportunity to download and install Sony’s updated DVD Architect version 5 software, included when you buy Vegas 8, but be advised that as before it’s still a DVD creation package that will give you nothing for CD work. Save the disk space and skip it... you can always go back and download it later.
Vegas Pro 8 is otherwise pretty much the same as version 7. It still does 24 bits and 192kHz sample rates, and still includes lots of audio effects. It will still burn an audio CD from inside the program, and still does high-quality time-stretching. In other words, it’s the same.
So for those of you who are Vegas heads or read the previous review of version 7, rest assured that little of what you know has changed, and I’m not going to repeat myself. Instead, let’s focus on what is new and improved. That’s the Mixing Console.
THE MIXING CONSOLE
Vegas users now have a legitimate case for adding a second monitor and a dual-head video card to their editing rig. The new Mixing Console window does not replace the current Mixer window, but allows you to see the entire mixer in a single window, which is invaluable for setting up complex bussing schemes, and as far as I am concerned, turns Vegas into a much more capable audio production tool.
The new Mixing Console window is home to the same set of controls as the Mixer window shows, including buttons for Properties, Downmixing (from surround to stereo or stereo to mono), Dim Output, and Insert Audio Track/Assignable FX/Bus. In addition, a list down the left hand side displays all available channels (based on your tracks) with a checkbox to show or hide any or all of them. The show/hide checkbox works on whatever tracks are currently selected, and it’s easy to see at a glance which tracks are not visible. One small quibble is the re-sizeable dividing line between this list and the rest of the Mixing Console display — I tend to use succinct labels for tracks (which of course become the channel names in the Mixing Console), but the dividing line can’t be moved leftward past a certain point. In my case that point leaves the list about twice as wide as it actually needs to be, and wastes valuable screen real estate in the process.
Between the track list and the Preview channel are two groups of vertical buttons that let you show or hide tracks or functions selectively, with the top button labeled Show All. The upper group lets you hide tracks by their type, while the lower buttons let you hide sections by function. Don’t want to see any buss tracks? Just press the busses button. Pressing the I/O button from the lower group will hide those buttons and extend the meters/faders to fit. You will note that some of the lower function show/hide buttons may not seem to work, depending upon your screen resolution. For example, on my 800x600 display I could not hide the Meter Control section unless I hid the Sends first — evidently there just wasn’t enough vertical room. When I did hide the Sends, pressing the Meter Control button actually moved the meters up into their own section, where they became as wide as the channel strip itself. The faders remained below, sans meters. Pressing the Faders button after that caused the faders and pans to disappear, and the meters filled the vertical height where the faders used to be. I like big meters, I really do, but this was a bit over the top even for me!
With the Mixing Console Window fully extended vertically and all Show buttons enabled, the mixer shows the aforementioned Properties, Downmixing, etc. buttons along the top, then the Insert FX group, then the Sends group, then the I/O, and finally the Faders with meters alongside. Moreover, the dividing lines between the Insert FX group and the Sends group, and between the Sends group and the I/O group are both moveable with the mouse. You can set up what you see and what you hide to suit your style of workflow and tastes. Very nice.
WHY YOU SHOULD CARE
Gone are the days when you had to move between the Track window and the Mixer window to work with subgroups or effects, since the original Mixer shows only properties for the Preview buss (which controls volume in the Media, Trimmer, Explorer, and Manager windows), Master buss, Assignable FX, and active Busses themselves. Now you can see all that in a single window, greatly simplifying Vegas’ interface overall.
Also gone is the need to check the outputs of your tracks from the Track display itself, where the track you need to check is invariably located below the bottom of the window, and you have to scroll down through other tracks to find it. With the Mixing Console window you can simply look across the visible channels and find the information you need.
The case for a second monitor is not only legitimate, it borders on being mandatory. While you can dock the Mixing Console window just as with the Mixer, it actually makes more sense to let it float. As a floating window, the Mixing Console will of course cover up a good portion of your Track window and any other docked windows you may have in your layout.
The trick to getting the most from all this new eye candy is to use the Window Layout feature early and often. If you don’t use it, then you’re not getting as much from Vegas as it has to offer, and learning to use it effectively will speed your workflow, I promise. I’ve included here three of my favorite layouts for your dining and dancing pleasure. You’ll notice that yes, they’re Pro Tools-ish, but after years of using PT on a daily basis it’s what I’m used to. Your mileage may vary, but here they are.
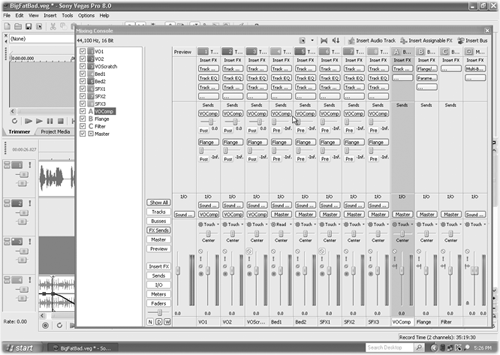
The first figure (My PT Layout) is a complete rip of Pro Tools, with a big Mixing Console window on top of a Track window that has no docked items. This layout begs for a second monitor, and the Mixing Console window could be slid rightward onto it. The bonus here is that your second screen can be smaller (and cheaper). If your main monitor is 21 inches or more, you could easily add a very inexpensive 17 or 19-incher just for the Console, and then tweak the individual elements of the Console so as to get maximum visibility for the things you use most often. Remember that as you slide the big Console window around it’s going to try to dock with the Tracks window — to avoid this, click on the Console window then press Control before you move it to keep it from docking.
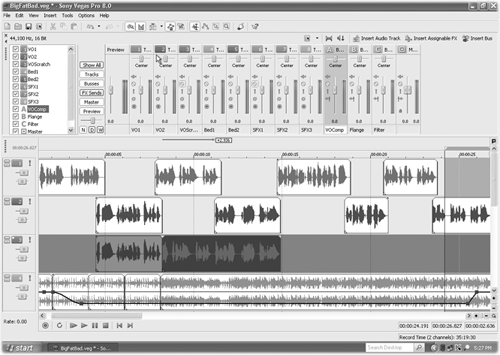
The second figure (My Docked Mix) shows the Mixing Console docked along with the Tracks window, and again there are no other items docked. While not as effective for mixing, the advantage of this layout is that at least you can see all the fader objects plus whatever other objects you’re willing to devote screen space to; yes, you’ll end up making the Track display shorter, but I was able to find a good balance here between the two.
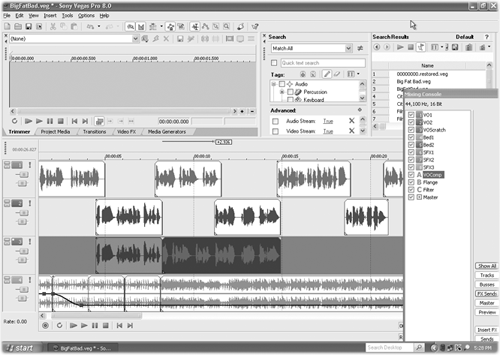
The third figure (My Docked Search) has a docked multifuction window (containing the Trimmer, Media Explorer, etc.) and a docked Media Manager Search window joining the Tracks window, with the big Console window slid off to the right. This layout again shrieks for a second monitor to hold the Console, but it’ll do in a pinch when you’re still adding and editing media to your project on a single monitor.
Once you’ve got several layouts set up to your liking, you’ll want to memorize the key commands to recall them quickly. Each of your layouts gets stored in the Window Layouts menu against a number, from 0 to 9.
To recall a layout, press Alt+D to invoke the Layout command, then hit the number key above your keyboard that corresponds to the layout you want to use. Note that the numeric keypad doesn’t work for this — you have to use the row of numbers above the letter keys. It is a two-keystroke process, but you’ll get quick with it and you will be well-pleased with how simple it is and how it speeds your workflow overall.
Try it!
I have to say that version 8 also felt somewhat snappier to me. I didn’t do a thorough comparison of version 7 versus version 8, and I’m not willing to bet on it. But I have to say that in general it did feel more efficient when using it on the same machine that’s been home to Vegas Pro 7 for a year and a half. Again, YMMV, but it certainly ain’t slower.
BUILT-IN TUTORIALS
The new built-in tutorial videos are invaluable for newbies to Vegas, but equally useful for more seasoned audio vets like me who want to try something new in the video category. These tutorials are not actually videos per se, but rather are interactive Flash “slides” that take you through the steps of whatever process you’ve chosen, and draw arrows and circles over your project to illustrate which button to press next. When you click the indicated button or knob on the screen, then the next “slide” comes up directing you to the next step. What’s there is well-done, although I wish there were more of them. But you’ll use ‘em eventually; at some point even the most senior among you may want to cut some picture so you can post it on YouTube, and that’s when the tutorials will help you make Vegas dance in ways you’ve never explored.
OTHER GOODIES
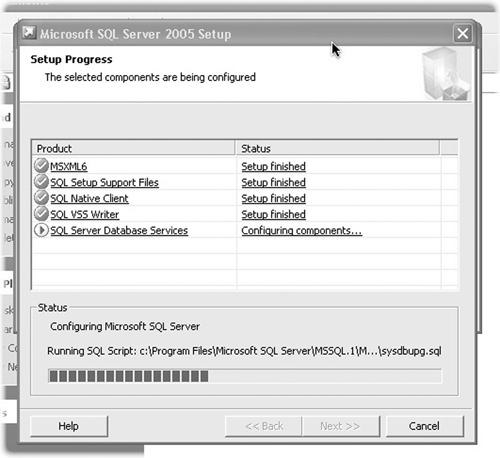
Yes, there are some. For those of you who use the optional Sony Media Manager which is based on Microsoft’s SQL Server software, you have the option with Vegas 8 to install an updated version of it. For those of you who haven’t used it, you may wish to consider it — the Media Manager integrates seamlessly into Vegas, and does a very good job of helping you catalog your online and offline audio goodies. I’m just beginning to understand how it does its work, but I can already see that as a general library-building tool it has its advantages (and no disadvantages that I can see as of yet). You can see the updates in the screen shot that you’ll see near the end of the installation [Install MSSQL Server 2.tif].
There’s lots of new stuff for the vidiots among us, including an improved video processing engine, multi-camera editing, and a titler.
But for those of us who do audio, it’s all about the Mixing Console.
IS IT WORTH IT?
The upgrade from any previous full version of Vegas Pro still carries a price tag of $235 (download) or $250 (boxed), which is substantially more than what I’m used to seeing for an upgrade. The full version is now $550 for the download version and $600 for the boxed version.
Should you upgrade? It’s still not cheap, but for me it’s worth it (and I paid for mine, thank you). Having a real Mixing Console to work on makes all the difference, and makes Vegas Pro 8 feel like a modern DAW, instead of an update of a software editor from the early 1990’s.
The difference for me is substantial. Steve sez check it out.
Vegas + DVD Production Suite carries a suggested retail price of $549.95 (download) or $599.95 (boxed). A demo version is available, as is more information at www.sonycreativesoftware.com.
♦

