by Steve Cunningham
It’s been nearly five years since we looked at Sony’s Vegas multitrack audio editor (and video production suite). Back then we reviewed Vegas Video 3.0, produced by the boutique-sized Sonic Foundry company. Media giant Sony bought the Vegas product line in 2003, along with Acid Pro, Sound Forge and others, and they’ve released regular upgrades for all of them. Vegas Video 3.0 is also the last version installed on my laptop, so it’s high time we took a fresh look at an editor that’s still widely used in the production community.
If you’re an old hand with Vegas, you will be right at home with the new version. Those using version 6 will find a few improvements, most of which are designed to make the program substantially faster on newer hardware (see WRAP UP for features new specifically to version 7.0). Those of you using older versions should read on and prepare to spend money!
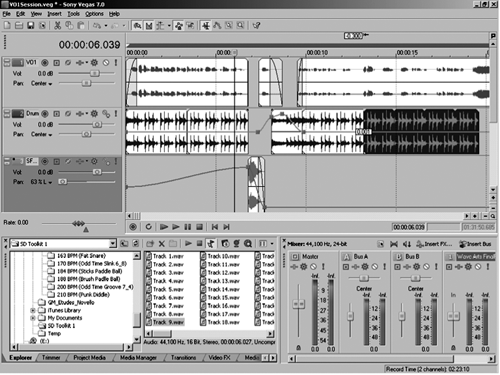
Vegas is a simple and elegant multitrack audio recording and editing package that also handles loops well, thanks to its sibling relationship with Sony’s Acid. The program’s strong point has been and still is its simplicity — everything can be done from Vegas’ single session display with tracks in the upper half, and file management, plug-ins, and metering in the lower half. It still has no permanent, dedicated mixing window, but trust me, you won’t miss it.
Vegas 7 comes with over 30 audio effects, supports VST plug-ins, and works with 8-, 16-, or 24-bit digital audio at sample rates up to 192kHz. It fully supports the ASIO driver standard, so you can use most any high-quality audio interface with it including multi-output interfaces for 5.1 surround. The maximum number of tracks in Vegas 7 is limited only by your CPU and RAM, as is the available number of Undo’s.
Vegas 7’s minimum system requirements are an 800MHz P4 or better processor running Windows 2000 SP4, XP Home or Pro; 256 MB of RAM and 200 MB of hard disk space; a Windows-compatible sound card and a DVD-ROM drive (the installation disk is a DVD — no install CDs are available). Like all modern audio editors, Vegas will be much happier on a more powerful machine with at least 512 MB of RAM and a big hard drive.
INSTALLATION
I bought the downloadable version of the update from sonymediasoftware.com, so all the files I needed were immediately available; you can also buy the upgrade in a boxed version for a few additional shekels. After the downloads were done, I ran the Vegas 7.0 installer on my 2.4GHz Pentium IV laptop running Windows 2000 SP4. The installer informed me that DirectX version 9 was required, then automatically downloaded and installed it along with all its updates. It required a restart which left me looking at Windows Desktop again, so I had to start Vegas’ install again afterward. A window appeared telling me that some program had installed an older version of “CDDB ActiveX Control” and that this would create problems, so I chose the button to “override the previous installation”.
Next it installed the Sony Media Manager version 2.2 software, and Microsoft’s “Data Access Components v. 2.8”. The latter required yet another restart, and then announced that it was installing Microsoft’s SQL Server Desktop Engine to power the Media Manager installation. The entire business ate up half a gigabyte of hard disk space on my machine, although the official requirement for Vegas is 200 MB. In fairness, the SQL server and its associated files ate up 200 MB on their own, and if you’re running XP you may already have the extras that my Win 2000 machine required. Nevertheless I found the process somewhat nerve-wracking. On first starting Vegas up, I was prompted to register it using the serial number provided in an email I received after my purchase. You’ll have 30 days to register Vegas online before it stops working, and that part of the process was certainly the simplest of the entire install.

HONEY I’M HOME
However, once the main window opened I felt quite at home. Sony hasn’t changed Vegas’ basic interface, which still bears more than a passing resemblance to Sound Forge and organizes everything you need in one window. I recommend that you setup some preferences before you get into the good stuff. First stop is the Project Properties window, which can be found under the File menu. Here you can set Audio Properties (and Video as well) and Ruler units, among others. Besides sample rate and bit depth, Properties include Resample and Stretch quality, which defaults to Good — change it to Best unless you like artifacts. You can also set a master Recorded Files folder for clips you don’t put into their own folders, decide whether you want to work in stereo or 5.1 Master Buss modes, and set the number of stereo busses that will be made available. More busses is more fun, but also more memory.
The next stop is the View menu, where you can create and save your favorite window layouts so once you learn the program you can personalize it. While Vegas always displays tracks in the upper half, the lower half is highly customizable; in particular the lower left quadrant features a Window Docking Area (WDA), with tabs that will show a File Trimmer view, the Media Manager view, and a standard Windows Explorer view. The fastest way to access these is to create presets and recall them by pressing Alt plus the preset number.
The third stop is the Options menu where you can access the Preferences page. There are twelve sub-pages and a gang of choices within those, but you will have to choose your Audio Device before you do any sound work. You will also want to show Vegas where it can find your third-party plugs if you have them. Like Acid and Sound Forge, Vegas can use VST plug-ins as well as Direct X ones.
Did I mention that the main page is easy to understand? There are four main areas under the Windows toolbar: the Track List, the Timeline, the aforementioned WDA. The Track List lives on the left-hand side and contains all the track controls such as record arm, phase, FX, automation mode, mute and solo, plus horizontal faders for volume and pan. The pan fader also performs other functions, chosen from a drop-down menu, such as controlling auxiliary send levels. When you arm a track for recording, a level meter and input channel appear.
Each track has a Minimize Track Height and a Maximize Track Height button so you can open it to full height for editing, then squeeze it down again. Alternatively, you can grab the dividing line below a track and stretch or shrink it by dragging. This makes it easier to squeeze a lot of tracks into limited screen space and still have access to the most important controls for mixing. Right-clicking an open area within the Track List lets you to add and delete tracks, rename them, view envelopes and switches, and so forth.

FX GALORE
Clicking on a track’s FX button opens an FX Chainer window, displaying all the plug-ins that are active on that track and allowing you to make changes and re-order them. Directly above the Track List is a floatable, resizable Time Display showing the ‘now’ time, and a ruler that runs above the timeline. Right-clicking on either one of them brings up a drop-down menu that you can use to change their respective time formats. Hitting “M” inserts Markers in the Marker Bar area above the ruler, which are automatically numbered, and can be named or deleted by right-clicking.
Above the waveforms and Timeline ruler are the region in/out selectors for defining edit regions, and the Scrub control which works reasonably well. You can grab it and scrub forwards and backwards at a rate controlled by the bar while the audio plays. It’s not the smoothest scrub I’ve ever worked with, but it qualifies as Quite Good Enough.
By default, the WDA is in the bottom half of the main window, but each tab is completely floatable. These tabs include the Trimmer, three tabs for finding and organizing media (Explorer, Project Media and Media Manager), and three tabs for video. The simple mixer strip on the lower right can also be floated.
The Trimmer tab is for trimming (duh), or you can click a button that will open the clip for surgical editing in your preferred stereo editor (Sony would like that to be Sound Forge, of course). The Trimmer has its own transport, scrubber, and region set points for looping. The Explorer triplet of tabs lets you find your stuff the old-fashioned way, keep track of your Project Media automatically, or organize and classify your clips via the Media Manager, although the latter is clearly aimed at video folks.

THE UN-MIXER
The Mixer panel includes the Master fader and meter, along with however many Busses and FX sends you’ve specified. You can right-click on any empty space within the Mixer panel to bring up the same button choices that you’ll find at the top of the Mixer section. These include automatic down-mixing from 5.1 to stereo or stereo to mono, a handy Dim switch and Insert FX or Insert Bus commands, the last of which allows you to add extra busses to your default configuration.
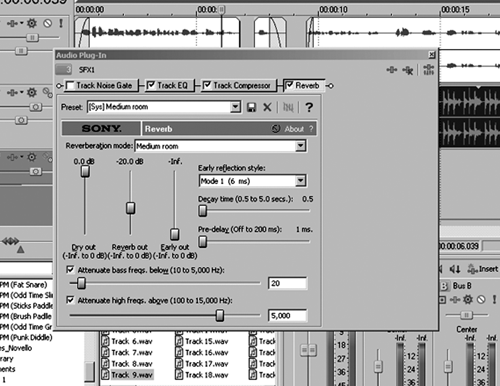
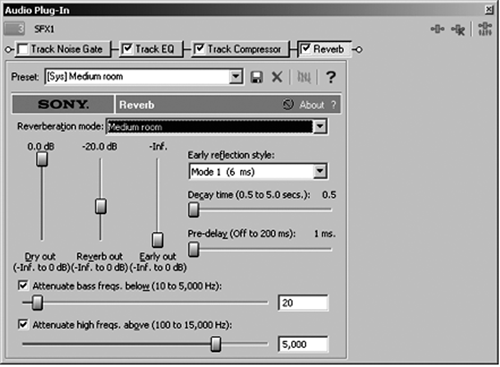
Unlike the Master and global effects panel, the individual track’s FX Chainers come preloaded with a Noise Gate, EQ and Compressor. These are low-CPU, real-time plug-ins, and they sound fine. In addition to the basic plug-ins, Vegas has a standard complement of effects, including various EQs, chorus, flanger, reverb and other time-based effects, and multi-band dynamics. All of them work in real-time, which is a bonus. The Chainer is also where you add your third-party VST or Direct X plug-ins, of course.
Recording is as easy as choosing an input within each track on the Track List by right-clicking on an empty area. This produces the pop-up menu where, among all the other channel functions, you choose Recording Inputs. Hit the track’s Record Arm button, which enables the level meter, and hit Record in the Transport bar — the recording will appear in the timeline. Once you have finished recording, you can name it prior to saving it, or just let Vegas automatically number it. You can always right-click on any clip later to rename it in the Properties window.
One of my favorite Vegas editing features is the snap indicator. When the boundaries of clips on different tracks line up, the vertical cursor position line marking the Now time turns blue where the boundaries meet, even across non-adjacent tracks. This makes it easy to line up hits or VO lines without resorting to zooming in and out. As long as your audio Events are trimmed tightly, you can tell when they meet as you slide them across the timeline.
WRAP UP
Of all the multitrack editors I’ve used, Vegas seems the most effortless of all. It works smoothly and everything appears to be right where I need it. Mouse clicks and commands all follow the same paradigms across the different pages, and generally conform to the way Windows works in general. Even after an extended absence dwelling in the house of Digi, I was able to get back up to speed on Vegas in very short order. It sounds good, and takes full advantage of the best audio interface I own.
I did suffer a bout of sticker shock when I learned that the upgrade from any previous full version of Vegas carries a price tag of $235 (download) or $250 (boxed), which is substantially more than what I’m used to seeing for an upgrade. I checked out the two cheaper versions of Vegas 7, namely Vegas Movie Studio and Movie Studio Platinum, but these are strictly for video folks as they’ll only give you four audio tracks. No dice.
If you’re upgrading from Vegas version 5 or 6 you may want to hold off. The features new solely to version 7 include a multi-threaded engine to take advantage of current CPUs, multi-channel audio import, export and rendering, improved VST plug-in support, and the multiple-Event snap indicator mentioned above. Good stuff, but it’s not enough to warrant a high-ticket upgrade. It should also be noted that DVD Architect 4 is included with Vegas 7, but this program has little in common with Sony’s CD Architect 5, which is included as part of Sound Forge. It’s strictly for creating video DVDs with titles and whatnot.
On the other hand, if like me you’re upgrading from version 3 or 4, it’s not a bad deal considering that the program carries a retail price of $525 for the download version and $560 for the boxed version, and there’s a lot that’s new for us old timers.
Vegas + DVD Production Suite carries a suggested retail price of $524.96 (download) or $559.96 (boxed). A demo version is available, as is more information at www.sonymediasoftware .com.
♦

