By Todd Bolitho
Memory Lane
I have been immersed in music and technology since I was born. My father is an organist; he played in virtually every western and eastern European country long before the Berlin Wall came down. As little children, my siblings and I would play hide-and-seek under the pews for days while my father practiced on enormous pipe organs. He might as well have injected Bach directly into my bloodstream. And since organists are, by nature, technical people, my dad also taught me about tools, wood, cars and electricity. He taught me to use his 1940’s era Weber wire recorder. I still have it. It was only natural that I would gravitate to recording – a field both musical and technical.
When I was fifteen, I did my first professional recording at Uncle Dirty’s Sound Machine in Kalamazoo. After that, Bryce Robertson, the owner, took me under his wing and let me work there for hundreds of hours on spec. Just as I began to move into the world of professional recording, I hit a stroke of luck. I didn’t really understand how lucky I was at the time. There was a local band of high school musicians named Sisi Watu. I heard them play a few times, but one time in particular stands out in my mind. It was an evening dance at the high school. I walked into the cafeteria where they were playing and felt the entire room moving to the strength of their incredible rhythm section. I listened carefully and especially noticed all of the Latin and African percussion. Most important, the bass player was on fire. Every tiny motion, every nuance of his playing was critical. Somehow he just knew what the music needed and he never made a mistake. To this day, I have never encountered a rhythm section to rival what I heard (more like felt in my gut) that night.
Over the next few weeks, I made a point to sit and talk with this bass player during lunchtime when he went into the school music rooms to practice. I can’t claim any significance in his world, but he certainly influenced mine. I’ve spent my entire professional life lavishing attention on the bass because he defined for me what was possible. One day, he told me he was going to drop out of Albion High School and go to New York. He knew he was going to be a success and didn’t mind saying so. A few days later, he was gone. Everyone in our little town shook their heads, clucked their tongues and said it was such a shame, him wasting his future like that. Within four years, he did everything he said he would and more. He is still a major figure in music today. That young bassist was Bill Laswell.
In my twenties, I was again blessed as amazing talent swirled around me. And once again, I didn’t realize it at the time. I was hired by two former Motown engineers (Michael Grace and John Lewis) to work as a MIDI producer and engineer in Sound Suite, a premier Detroit recording facility. Sound Suite’s “Studio A” was a Westlake design featuring an enormous SSL series E console. It was an amazing place to work. I was exposed to incredible people; I sponged up every bit of knowledge they would share. Michael Grace taught me how to calibrate big multitrack machines and the basics of kick drum/bass management. Understand now, this was a Motown guy teaching me how to notch out frequencies and compress/limit kick drum and bass! To further my education as a young producer/engineer, he sent me over to the Winans’ private studio. I was to hand-deliver master tapes, but I had instructions to stay and watch for a while. More exposure to amazing talent and incredibly kind people. Somewhere along the way I met Cecil Franklin, who took an interest in my music and introduced me to his sister. His sister? That would be Aretha. Cecil was her manager. Looking back, I can hardly believe it, but I was in the room when Anita Baker recorded some of the vocals for her Grammy-winning album, Givin’ You The Best That I Got. Michael and John could pick up the phone and call anyone in the recording industry. The environment was totally professional, but they knew how to have fun too. Everyone kept track of the high scores on the Ms. Pacman machine in the lobby.
Later, I worked as MIDI producer for The Disc, another Detroit studio with an SSL - a series G. Once again, fantastic talent was always present. George Clinton was working out of The Disc while I was there, and it was his business manager, Rick Cioffi, who hired me to do the sound track for the Wendigo movie.
There are other great stories I could share but suffice to say that by the end of the eighties, I knew what I was doing in a recording studio. I was comfortable with SSL boards, and I had been involved with a lot of good work. I loved messing with tools, wood, motorcycles and cars. Now here’s what I am leading to:
When it came time to build my own recording studios, I knew enough to realize I needed a team. I’m saying, don’t try to do it all yourself. No matter how much experience you have, no matter how good you are with tools, there are the right people out there who can guide you and greatly enhance the quality of your perfect dream studio.
I built my first studio the spring of 1986 with my musical partner, Kenn Rickman, a licensed carpenter and an inspired guitarist. We knew the value of great soundproofing and careful electronic design. Kenn had the woodworking skills to implement a very complicated plan. The powerful production room we created together was one of the first of its kind anywhere, a MIDI studio with 27 different sound sources, fully synchronized to an Otari multi-track machine. In spite of the breathtaking MIDI capabilities, that studio was mostly hardware-based. Everything was mixed manually and all processing was done with expensive rack-mounted gear from Lexicon, Orban, and other high-end manufacturers. The meticulous soundproofing and solid electronics utilized in that studio became the successful foundation for the Wendigo film score, Clean Sheets music libraries, and many other productions.
My second studio came years later, long after I had given up professional production work and shortly after the revolution in software-based recording. It was not a commercial venture. It consisted of a Groove Tube mic, a SeaSound Solo plus Expander, some good software, and blankets hung all over my home office for sound absorption. I had a few friends come by and we made some fair recordings in that room, but we were plagued with soundproofing and acoustical problems. Every time a truck drove by, the vocals got ruined. There were a lot of trucks. We kept making small improvements to the room, but they amounted to nothing more than fingers in the dam. Sound isolation was always a variable.
My most recent studio project evolved as an answer to frustration over recording quality in my blanket-covered office. The new studio did not begin as a commercial venture, but it has become one. This new studio came out right. Like the first one, built with my carpenter friend, all sound isolation issues were resolved before construction ever began. Like that first studio, I had a lot of help building it. Like Sound Suite, the rooms are finished wood with acoustical treatments. I learned a lot during the process. There were costly mistakes along the way, and while it probably couldn’t have turned out much better, I could have done the same for less money. I hope my experience can help you in your studio design.
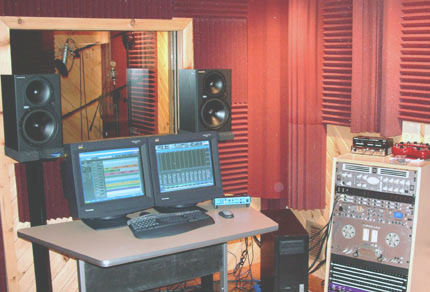
Figure out where you want to build. There are two common places to build home studios, the basement and the freestanding garage. I chose the basement for mine, but most basements are not suitable. Fortunately, my basement had unusually high ceilings and unusually good sound isolation qualities. Other factors in my decision — Northern Michigan winters pack a lot of snow so we really needed some place to keep the vehicles where we wouldn’t have to dig them out. Add into that our garage is attached to the house so its sound isolation properties are not great. Freestanding garages, on the other hand, are often perfectly suited for conversion to studios because they offer high vaulted ceilings, total sound isolation from the home, and easy ground-level access for equipment. If you have a freestanding garage, you might want to build your studio there.
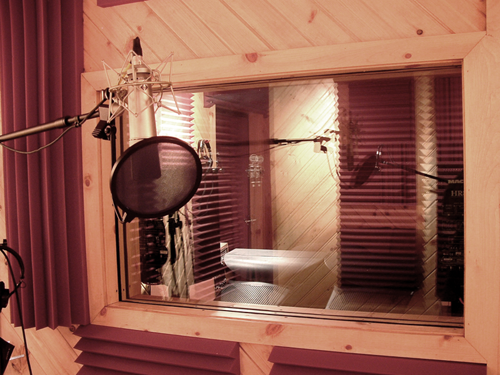
Get to know Auralex products. Go to http://acoustics101.com/ and start reading. Pay special attention to Sheetblock and its applications. I strongly suggest you print out all the construction tutorials and give them to your builder or carpenter. Ask him to fully familiarize himself with everything there and schedule a paid meeting where he will review all of it with you. These manuals are quite technical but a smart carpenter can figure them out and help you understand all the various techniques and methods. While Auralex really is a good choice for your soundproofing products, I regret to say that I encountered serious quality control issues with them. Those issues were: 1) One roll of Sheetblock was delivered mal-formed and unusable. About 8-10 feet into the roll there was a huge gaping hole (roughly 2½ feet long by a variable width of 3-6 inches) where the vinyl didn’t form up properly at the factory. How they missed this and shipped it out is beyond understanding. Since each roll weighs 120 pounds, I was not happy about having to pack it up and send it back. What a job. 2) One box of VersaTiles was delivered with BB-sized holes throughout the foam. I called the factory about this and their representative argued that it was within their quality-control norms. I insisted that the VersaTiles should match all the other foam products I ordered. In the end, they agreed and sent a new box of VersaTiles, without BB-holes.
If you buy these products from Sweetwater (I recommend it), they will stand with you shoulder-to-shoulder to correct anything that isn’t right. You will also get a better price. Auralex’s products are nice, but I recommend going through a “middle man” with clout.
Learn all about Sharka computer solutions. Go to http://sharkacomputers .com/ and let your mind imagine all the possibilities. Then get a great computer guy to build you the perfect audio computer. Or you can get Sharka to build your system. You’ll get a killer computer, custom-tailored for media work. But Sharka won’t be able to drive over and help you out if you want to make adjustments. For that, you need someone local to you. So you may want to pass the information to a highly skilled local pro and work closely with him to design the perfect machine for your needs. Mac users (and everyone else, please) read on to the next paragraph.
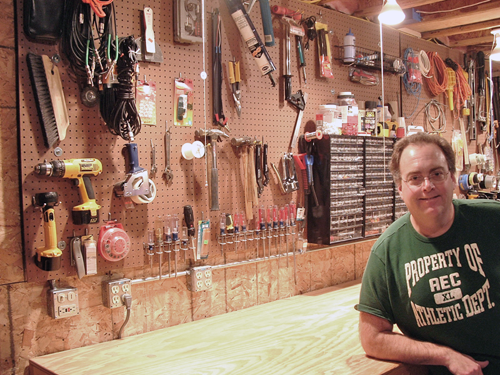
Get someone at Sweetwater. I am definitely a fan of this company. Call and get assigned to one of their experts. Sweetwater calls their reps “sales engineers” because they are so well trained in both sales and recording technology. Reps receive advanced technical training twice a week and conduct hands-on comparative “shoot-outs” with all the gear they carry. They are not afraid to tell you who won and by how much. Sweetwater builds thousands of “turn-key” audio-optimized computer systems each year, both Mac and PC. Be sure to request their tutorial on optimizing your system for audio.
My Sweetwater guy, Jeff Barnett, has guided me so consistently and so well in selecting new audio gear, I have virtually nothing that I don’t use regularly. Much of what I have was purchased after Jeff took time to update me on the latest and greatest advances. I’ve learned to trust him. If you want to call Jeff, he’s at: 800-222-4700 ext. 1283.
Go to http://xptweaks.org and learn to really tweak out an XP machine. Start by getting rid of Microsoft Messenger but don’t stop there. Get into the page about shutting down unnecessary services. You’ll pick up some processing power. One last piece of tweak advice – I wouldn’t install Service Pack II.
Assemble Your Team
A president needs a cabinet of experts. He counts on these people to guide him through highly technical issues. As I hinted above, your decision to employ this team approach is the single most important decision you can make toward creation of the perfect studio. There are four areas where you will need the knowledge and skills of your cabinet professionals: 1) home electrical wiring, 2) carpentry/construction, 3) specialized audio computer design, and 4) audio equipment.
If you are absolutely sure you personally have professional level skills in one of these areas, you may opt to skip hiring someone in that category. But be warned, these are the links in the chain. And the weakest link can break, ruining all your efforts.
For my team, I chose Ronnie Byer as carpenter, Bo McCurdy as my computer guy and Jeff Barnett to guide me in my audio design. Each was instrumental in helping me create a powerful, beautifully finished studio that causes clients and friends to catch their breath every time they enter the control room.
Construction
I needed an electrician to install a 240v line to the other side of my house but after he installed the breaker box, I felt competent enough to completely wire the studio on my own. I wanted commercial 20 amp circuits throughout so that meant 14-gauge wiring, industrial receptacles, 20 amp switches and GFCIs on every circuit. 14-guage is not the easiest stuff to work with because it’s so stiff, but I wanted rock-solid power for my system. I opted for a second breaker box because I didn’t want any line noise if someone in the house turned on the blender.
Jeff Barnett advised me not to set the dimensions for my rooms until I called Auralex. That was great advice. They offer a free consultation service that utilizes computer modeling to predict the acoustical properties of various room dimensions. Their models impacted my design in ways I would never have considered. Specifically, they recommended making my control room large and deep, while making the live room smaller. I would have done the opposite if not for their guidance and explanation. I must say, I am very happy with the result. Both rooms sound spectacular.
After you figure out some room dimensions that make sense acoustically, you will need to frame it all in. I chose to build my frame with 2x6s, 12” apart, because such heavy-duty construction was more acoustically “dead”, and because I knew how much weight it would eventually carry. I decided to place all receptacles on switched circuits so I could turn everything on at once. Each room has its own power switch. The only exception was for the circuit running the computer. I wanted to be sure that no one could accidentally turn off the computer without a proper shutdown.
The easiest and cheapest way to run power for your studio is with conduit mounted right onto the walls. It isn’t pretty, but it offers excellent shielding and does not create big sound leaks in your walls. If you care a lot about creating a finished look to your rooms, you can use my invented installation method. I call it, “second level sound proofing.” Behind each flush-mounted wall receptacle, I built a box 12”x12”x4” and lined it with Sheetblock. I ran my 14-gauge wire into the box through a very small hole and then plugged the hole with Great Stuff plumber’s foam. Any sound leaking into this box through the receptacles gets no further. Likewise, outside noise cannot invade the room through the receptacle’s secondary level of soundproofing. After your electrical installation is complete, you can fill the second level or outer box with plumber’s foam. Just punch out one of the wire holes in your electrical box and squirt the foam in. Try not to overfill, but if you do squirt a little too much, wait for the foam to dry completely before removing any excess. I must point out that this is extremely tedious and painstaking work to build all these boxes, line them with Sheetblock, backfill with foam, etc. It seemed to take forever while I was doing it. However, the finished look and functionality of totally soundproofed flush mounted wall receptacles was my reward.
I should take a moment to recommend a handful of products that will make your job easier. These are all available at Home Depot:
Carlon single gang adjustable wall boxes - Home Depot SKU 208-653. This amazing little box sells for $2.00, but it will save you hours of measuring and adjusting switch and receptacle boxes to match thick studio walls. You just mount the box on the stud, put up the wall (make sure the box hole is cut out of the wall), then spin a screw mounted inside the Carlon box to advance it right out to the thickness of your wall! This is painless and simple compared to fixed-depth boxes which you have to measure and place at exactly the right depth before installing the wall. Carlon two gang adjustable wall boxes – Home Depot SKU 208-684. About $3.50 each.
Super-Thoroseal waterproofer – Home Depot SKU 929-996. Costs $26.00 / 5 gal. Before you start building anything over concrete, it’s a good idea to waterproof. Use Thoroseal on cement block walls or concrete floors. It comes as a powder; you just add water. When mixed properly this product is very thick, so you will need a long stirring tool you can run off your electric drill. I just took a steel dowel, bent the end into a triangle and made my own stirring tool. Once we had that, it all went smoothly. Don’t try to stir it by hand. I doubt it’s even possible. Apply with thick rollers and whitewash brushes. It tends to spatter on your clothes much more than paint so wear something expendable. Two coats will do it. Water is never going to get past this tough stuff!
Tongue in groove knotty pine - Home Depot SKU 430-869. This is how we created a beautiful finish for the walls and ceilings. Quality control is always an issue with finish pine. Make sure you inspect every board carefully because they are delicate and easily damaged. Laying tongue in groove is an art form requiring great skill and years of practice, especially if you want the wood running on 45-degree slopes. I left it entirely to my carpenter and he didn’t let me down!
After you frame everything in and completely wire it, insulation is next. If you choose to mount the studs on 12” centers as I did, you will probably have to cut down your insulation. I couldn’t find any reasonably priced 12” wide insulation. Be sure to wear a filter mask.
Wall and ceiling construction was extremely difficult. Everything had to be built four times. We first brought our tongue-in-groove knotty pine into the house to acclimate for a month. Then we stained each board separately.
While the wood was acclimating, we installed the first layer of 5/8 drywall and sealed the seams. Then it was time to hang Sheetblock. I can’t overstate how hard this is. Sheetblock is 1/8’ thick heavy vinyl specially designed to block and absorb sound. Although it cuts very easily with a standard utility knife, hanging it on the wall is a quite a job. Weighing 1 lb. per square foot, it requires several mechanical fasteners per sheet to secure it. We were able to buy thin aluminum disks from our local lumber company and shoot carpet staples through them to hold it. After all the Sheetblock was in place, we put on another layer of 5/8’ inch drywall and sealed the seams. Our final layer was the beautiful tongue in groove knotty pine.
I discovered later that Auralex also makes Sheetblock Plus, which comes with its own adhesive. You just peel the backing paper away and place it on the wall or ceiling. Wow. Sheetblock Plus costs quite a bit more, but it is probably cheaper than what you will pay in labor to hang regular Sheetblock. If you are thinking you can hang this stuff by yourself, or even with a buddy, think again. You will need some professional help either during the process, or afterwards if you try to do it alone.
Studio doors are expensive. The latching mechanisms for doors 4-6” thick start at around $400. My solution was to buy exterior doors, line the frame with closed cell foam tape, and line both sides of the doors with Sheetblock Plus. I also squirted plumber’s foam into all the spaces around the frame, sealing it completely to the surrounding wall. You can paint Sheetblock with a latex paint on a roller and the result is quite good. The finishing touch was acoustical foam and diffusers mounted on the inside of the door.
This might come as a surprise but one of the biggest problems I faced was ventilation. Think about it… how do you get a large volume of air to move into and out of a room in total silence and without letting in outside noise? This was a tough one. I spent a lot of money on this and my design worked, but now that I’ve done it once, I know how I could do it a lot cheaper. Maybe I can help you avoid spending more than you need.
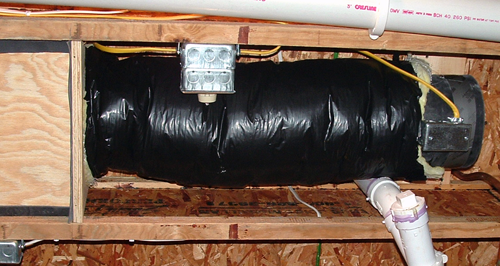
The secret to easy, inexpensive, soundproof ventilation is to use long runs of insulated flexible duct. Studio electronics tend to heat up a room, so your air outtakes should probably be mounted in the ceiling where they will remove heat. Run insulated flexible duct as far away from your studio as you can, then attach them to two-speed inline duct fans suspended on shock cords. Make sure your fans are pointing away from the source duct, so they will draw the air out of your studio. Use the low-speed hook-ups and run them to switches in your control room. Your studio’s air intakes should be near the floor far from the outtakes so the air will circulate well. Run flexible insulated duct again as far as possible. You might want to run it up and down between the studs inside the wall a couple times before leading it to the source of fresh air. You shouldn’t need a fan to drive the intakes because they will draw silently when the outtake fans are engaged. I had my carpenter build some small baffle boxes with standard furnace filters over the intakes as an extra precaution against noise and dust. If you find you don’t have enough ventilation, you can always add inline duct fans on the intakes later to push air into the room. My room didn’t require them. The outtake fans do the job. Add as much insulation as you can around the insulated flexible duct before you seal it all up in the walls and ceilings. There, now you know the secret! Do you wonder what I did so wrong? I made a lot of work for myself and spent a lot of money building rigid, insulated, fully sound-isolated channels under the ceiling and between the studs in the walls. It was all for naught. When I mounted the inline duct fans into my special channels the fan vibration was transmitted through the wood. That’s when I thought of isolating the fans by mounting them on rubber shock cords and connecting them to my channels with insulated flexible duct. Within seconds of turning them on I realized that was all I needed in the first place.
Of course, if you are building in a freestanding garage or other separate structure, you will need some kind of climate control beyond mere ventilation. The guiding principal in designing your system is to move large air masses slowly, and use long runs of insulated flexible duct to isolate your studio from the noise of furnaces, blowers and fans.
Flooring is the last step of room construction. You might think carpet is the answer but acoustically, it isn’t the best choice. Carpet absorbs high frequencies, but leaves the lows to roll around and cause problems in your room. Wood is the choice of nearly all professional studio designers. Hardwood floors can be costly, but there are several good tongue-in-groove wood laminate floor products that reflect sound exactly like an old-fashioned hardwood floor. Don’t believe any sales pitch about this being a one-man job. It takes two people to work these pieces together seamlessly, but it isn’t out of reach for the average physically fit couple and it’s even cheaper than carpet.
The Couch
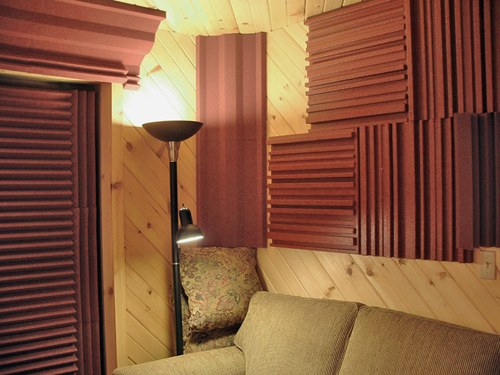
The couch in a studio is a huge deal. Everyone wants the couch. I chose one with all the colors of my room – reds, golds and browns, running in stripes on deep, plush pillows. Clients race to the couch!
The Computer
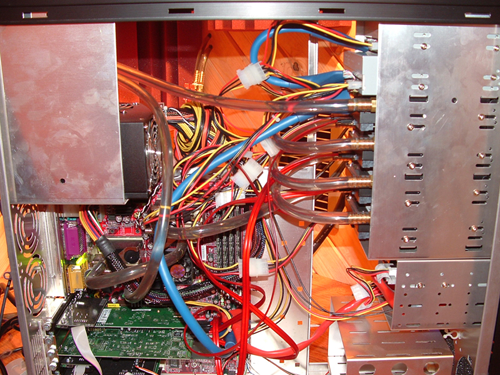
My local computer guy, Bo McCurdy, relished the challenge of building the ultimate audio computer. After much research, we opted for a dual processor server motherboard powered by 2.4 GHz. Athlons. A Matrox video card renders dual monitors — one displays the project window, the other shows the mixer. Two 240-gig RAID arrays provide a total of 480 gigs of hard drive capacity. The first RAID is for executables; the second RAID is strictly for audio data. Everything is water-cooled and the radiator is removed to the adjoining room via clear plastic tubing tightly fitted through the wall. Meticulous soundproofing in the wall around the tubing insures against sound leakage. There are no fans except for the special low-noise power supply. Newer power supplies are now available (from Sharka) with no fans at all,but mine is quiet. Most people can’t even hear it running. Bo did an incredible job. The heart of this studio is fast, reliable and quiet.
Audio
I utilize a variety of mics and preamps to get the right tonal colors for any given situation. After the preamps, the signal goes to Apogee converters.
The Apogees came ready for S/MUXing (sample multiplexing – a process that permits recording at high sample rates), but to turn on S/MUX, you had to move tiny dipswitches on the rear panel. I thought maybe I would just de-solder the dipswitches, run wires to the front of the unit and install micro switches on the front panel instead. I called the factory and asked them if they were willing to honor the warranty if I went ahead with my modification. They said not only would they honor my modification, they were planning something similar for their new models. As I understand it, the new 16 channel Apogees now keep it all on the front panel. Good for them!
From the converters, ADAT optical cables deliver the data stream to twin RME 9652 HDSP digital I/O cards. All converters and I/O cards are synced with an AardSync II wordclock.
Zero-latency monitoring is a feature of the RME cards. One good solution is to route the outputs to a monitor mixer. I route my monitor signals into C-Control, a neat little box especially designed to provide a variety of monitor solutions for computer based studios. Any gadget that saves work is great. I just love my C-Control.
Finally, Steinberg’s Nuendo, paired with a generous helping of software processors from Waves, makes for stunning power and flexibility.
Airworthy Sound Studio
Shortly after completion, word got around and I started doing work for paying clients again. If you would like to record, mix or master at Airworthy Sound Studio, please call 231-876-3474, or send me an email: airworthy

