by Steve Cunningham
Why would anyone involved in radio production ever consider using a software editor with the word “Video” in its name?
If the product is from Sonic Foundry, purveyors of the industry-standard Sound Forge stereo audio editor, you’d know enough to consider it. Even given that the product’s full moniker is Vegas Video, I’ll bet that you’d give it a go, and you’d be right to do so.
The Vegas product has been around for several years. In the beginning, Sonic Foundry developed Vegas, which begat Vegas Pro, both of which were video editors with very capable multitrack audio editing facilities. A couple of years ago the company split Vegas Pro into Vegas Video and Vegas Pro/Audio, presumably to more clearly serve the two very different markets. Sonic Foundry has now dropped Vegas Pro/Audio altogether and put all their R&D and marketing efforts behind Vegas Video version 3.0, which is the product we’ll examine here.
Ignoring the video component for now, Vegas Video 3.0 is a multitrack audio editor with a fairly complete suite of non-destructive recording, editing, and mixing tools. It comes with 18 DirectX audio effects, supports 8-, 16-, or 24-bit digital audio at sample rates up to 96KHz. The maximum number of tracks is limited only by your CPU and RAM, as is the number of Undo’s available. Vegas Video also has the ability to import a considerable variety of file formats, including WAV, AIFF, MP3, AVI and QuickTime. Similarly, it will export to MP3, WAV, AIFF, and it supports file authoring for Internet streaming applications, such as Real Networks G2 (RM) and Windows Media Technologies (WMA). Vegas Video 3 can even edit Windows Media files directly.
Vegas Video is a PC-based application whose system requirements are a 400MHz processor, 128 MB of RAM and 40 MB of hard disk space, a Windows-compatible sound card and a CD-ROM drive, as well as a VGA monitor (a 24-bit color display is recommended). VV runs under Microsoft Windows 98SE, Me, 2000, and XP, and requires both DirectX 8.0 or later and IE 5.0 or later (thoughtfully, both are included on the CD-ROM).
LOCK AND LOAD
Installation of Vegas Video was a snap for me, thanks to a well-written Installation Wizard. The program first presents you with a screen from which you can choose to install Vegas Video 3.0, a batch-file converter, or just browse the CD. The rest of the installer is brain-dead simple.
Like other Sonic Foundry products, on first run Vegas Video “encourages” you to register it with a screen that lets you register online, by phone, from another computer, or later. If you choose “later”, then the program will operate in 30-day demo mode. All functions are available and working, but on day 31 you can no longer start up the program. Furthermore, that screen will appear every time you start the program, so you’ll be well served to just register the thing straightaway.
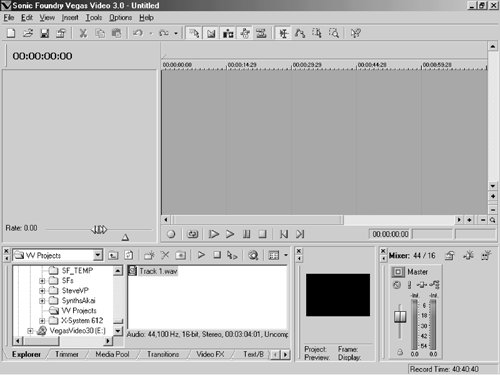
Once you’ve installed, booted, and registered the beast, it drops you into its main window from which you can do most everything, including record, edit, and mix. I am especially enamored of the fact that I can do 90% of my work from one screen, and yet it’s not overly cluttered. The interface displays the track view on top, while on the bottom you’ll find the browser, the master meters, and the video reference screen. The transport controls are just below the tracks ala Sound Forge, and a button bar across the top presents a quick way to get to the most-used functions.
Fact is, Vegas Video’s interface isn’t just an older brother of Sound Forge — rather it looks eerily like Acid Pro, right down to the track meters. If you use Acid then you’ll have little use for the online help, and if you’re a regular Sound Forge user you’ll feel at home in Vegas Video.
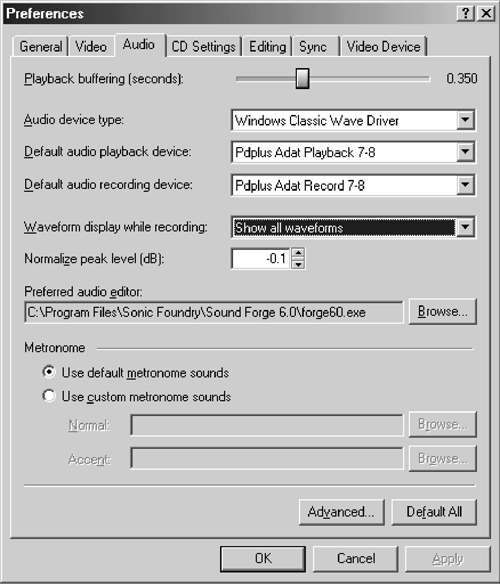
Take a quick trip to the Preferences menu and select the Audio tab to help VV find your sound card. You’ll first choose between Microsoft Sound Mapper and the “Classic Wave Driver.” (I had to select the latter in order for either of my audio cards to appear in the list.) Once that’s done you should probably scan the other preferences to select your attached CD burner, specify an external audio editing program for micro-surgery, and generally make sure that Vegas Video works as you’d like it.
Another quick trip you’ll want to take is to the View menu where you can hide the aforementioned video screen completely, which effectively gives you the look of Vegas Audio. That’s right, despite the product’s name, you can obscure the fact that Vegas Video knows anything about DV editing, and be on your audio-only way.
The button bar across the top duplicates various menu items and editing commands. Excluding the standard cut/copy/paste icons, I found the others to be not very intuitive (or maybe it’s just my old eyesight). There is a label that pops up when you hover the cursor over a button, but I still found myself just not using them. Oh well.
The program has a large collection of keyboard equivalents that operate every significant editing function, and they’re well thought out. For example, pressing S splits the file at the cursor, while control-E brings up your external software editor (Sound Forge for me) with the selected audio region ready to be hacked.
Finally, the browser window in the lower left wears several hats. The tabs along the bottom of the browser let it act as a file manager (the Explorer tab), a Trimmer/Previewer (where you can play recorded files without loading them), and a Media Pool where you can view just the audio files that are used in your current project. In case you’re wondering, the other tabs handle various video options.
EDITING
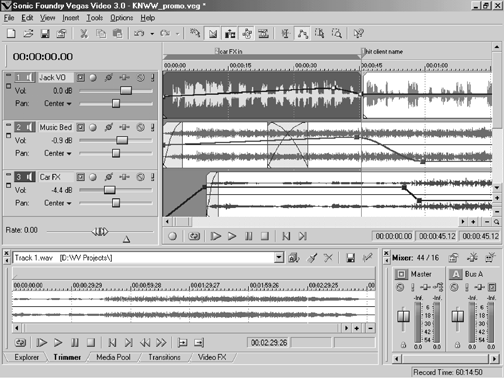
Vegas Video’s basic editing functions are competent and easy to use. There are four tools that you’ll use for editing in the tracks window. The Normal Edit tool is the standard I-beam that we’re all used to. The Envelope Edit tool lets you generate and adjust Volume and Pan envelopes (more on that later). The Selection Edit tool lets you highlight regions in multiple tracks, and the Zoom Edit tool fills the track window with whatever region you’ve chosen with it. Fortunately the D key on the keyboard toggles through these four tools, so you’ll be able to avoid the button bar.
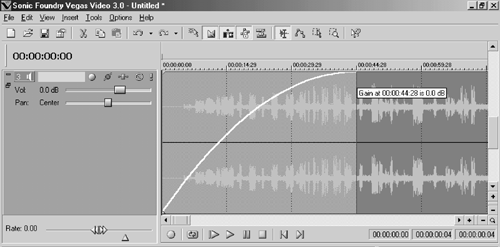
Like ProTools, Vegas Video gives you “handles” on the audio waveform that let you trim and fade without touching a menu. For example, if you hover over the end of a region then the cursor turns into a trim tool that lets you shorten or lengthen the region with a click and a drag. Hover over the triangle in the upper corner of the region and the cursor becomes a fade tool, complete with readout showing the dB level at that point. Mouse over the triangle in the lower left corner of a region and you can adjust the Snap Point, which acts as a sync marker for aligning effects to some point other than the beginning. And if you drag one region over another on the same track, Vegas Video automatically generates a crossfade between them. That’s slick.
While Vegas Video doesn’t have an on-screen mixer with faders and such, each track does have a Volume Envelope and a Pan Envelope attached, which allows you to “mix” your tracks as you wish. By right-clicking on the blue or red envelope line you can add automation “points” to the envelope, which you can then adjust to automate level and pan changes over time. The same right-click menu lets you choose a curved segment between points rather than a straight one, so you can generate some pretty complex automation moves quickly. The envelopes are independent of the audio underneath them, so if you want to move audio regions and keep the automation intact you’ll need to use the Lock Envelopes to Events button.
Having said that, Vegas Video doesn’t allow you to simply highlight part of a region and move just that part’s envelopes up or down, as ProTools does. You have to first establish envelope points, and that slowed me down a lot. I use the envelopes in ProTools to quickly silence mouth and breath noises, and having to set points first made that process more time-consuming.
You can create up to 26 stereo busses in VV, which are ideal for submixing and sending to and from effects. Each buss you create has as pair of master faders that show up next to the primary masters in the lower right, and the Pan slider on each track becomes a selectable Send control, accessed by clicking on a drop down menu. While this scheme saves precious real estate on the screen, the downside is that you can see only the pan control or one of the buss sends at a time.
Vegas Video allows audio scrubbing to find edit points, although in my opinion the scrub function is mis-named and is in reality a jog function (see below). The program gives you three methods of scrubbing, with the first and most obvious being to grab the Scrub Control located to the left of the transport controls. Moving it to the right makes the audio play forward, with full right giving you playback at twice real time. Moving it to the left does the same, but the sound plays in reverse. You can also use the keyboard to move the Scrub Control, or you can control-click in the track window itself. This last method is the most awkward, since you have to hover over the cursor in an area where there’s no event, usually on a blank track below where you’re working, and then press the Control key.
Why do I think Vegas Video’s audio scrub is really a jog? In the early days of DAWs, those of us involved in product design modeled our editing features to work like the venerable U-matic video decks. Many of these decks had a specific “scrub” knob, which when turned moved the tape forward or back as long as the knob was moving. You could spin the continuous knob around to find a point, and when you stopped moving it then the tape stopped. This was the equivalent of rocking the reels on an analog audio tape deck. On the other hand, you accessed a U-matic’s jog function by turning a bi-directional ring, which caused the video tape to move in a direction and at a speed proportional to the ring’s travel. The tape continued to move even when you stopped moving the ring, so to stop the tape you positioned the ring back at top dead center.
The latter is how Vegas Video works. When you invoke scrubbing using any of the three methods mentioned, the audio will begin to play until you release the scrub control, which will allow the control to jump back to its zero point and the audio will stop. The maximum speed in either direction is twice real time, and the control is responsive and smooth, but I’d rather have a real scrub function for finding tight edit points. You can transfer to another audio editor by pressing command-E. This opens the selected audio region in the editor of your choice — in my system this command opens the region in Sound Forge 6, which has a scrub function that does a “stuttering scrub” like a CD player. When you quit your external editor, you’ll be back in VV with the edited version of your region in place in the track.
EFFECTS
Each track in VV has a virtual effects box connected inline to it. Clicking on the Track FX button brings up a window where a noise gate, a four-band EQ, and a compressor are connected in series to that track. These all work in real time, each can be bypassed separately, and you can click and drag the label boxes to change the order of the three effects. There’s a nice collection of presets attached to each of the three that provide a good starting point for tweaking your track’s sound.
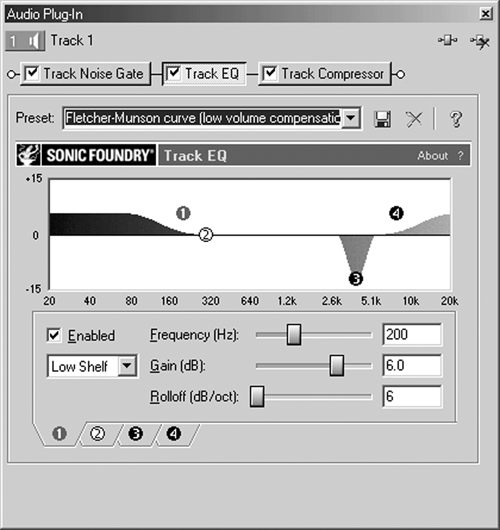
You can add other real-time effects to a track by clicking Insert Assignable Effects from the Tools menu. This brings up a dialog box similar to the inline box, but with a browser window showing the other DirectX plugs that come with VV. It works the same way in that you select an effect and it gets chained in series to the previous effect, and you can change the order and bypass them in a like fashion.
Non-realtime effects are also available from the Tools menu. This is where you’ll find your third-party effects, in addition to the ones supplied. For example, my beloved Waves processors show up in this dialog box as non-realtime processors.
If you tend to use a lot of processors and effects on your tracks, then at some point you’re computer’s CPU is going to poop out and cry, “No mas de effectors, por favor!” (Don’t ask why most PCs speaks Spanish, they just do. I know these things.) Fortunately VV lets you render a track, complete with whatever processing silliness you’ve assigned to it, to a new track. This is an offline function that chugs away, writes a new audio file to disk, and places it at the top of the tracks window.
By far my favorite effect on VV is its Time Stretch/Pitch Shift effect, which was called Rubber Audio in Vegas Pro/Audio. You find this effect by right-clicking on a region and choosing the Properties option. Time Stretch is right there at the bottom of that window. And this puppy not only sounds good, it’s nearly instantaneous even on long audio files. There’s a new algorithm for Time Stretch called Voice Optimized that really works well for smashing long legal into those last few seconds of a spot without having it sound processed. The quality of this effect is nearly worth the price of the entire product, even at high levels of stretch or squish. Nice.

NEW FEATURES
Most of the new features in Vegas Video 3 have to do with CD-R operation. First among these is Vegas Video’s ability to burn Red Book audio CDs, using Sonic Foundry’s CD Architect technology (or so it says in the brochure). You can burn audio tracks either Disk-at-Once or Track-at-Once, right from the time line. Establishing tracks and gaps is as simple as dropping markers. VV will also import older CD projects created in CD Architect, and the program can now extract audio from existing audio CDs.
WORTH IT?
If you’re a Vegas Pro/Audio user, is the upgrade worth the money? That’s hard to say. You already have most of the really cool features in the program, especially if you already own competent CD burning software. On the other hand, the new Voice-Optimized time stretch is very good, and might knock you off the fence on the upgrade side.
If you don’t own a Vegas product and are looking for a competent multitrack editor, you should definitely try the demo version of VV. It doesn’t have all the bells and whistles of ProTools or SAW, but the basics are there, they work, and the program beats both of those on at least a couple of counts. Download the demo and check it out.
Vegas Video is available from dealers, or directly from Sonic Foundry’s website where it is priced at $479.96 for the boxed version, and $419.97 for the downloadable version. The upgrade from Vegas Video 2 is $149.95, and from Vegas Pro/Audio is $179.95. For more information in the US, contact Sonic Foundry at (800) 577-6642. For more information worldwide, visit www.sonicfoundry.com.
♦

