by Steve Cunningham
As some of you know, I’m a Macintosh guy. While I’ve used Wintel computers now and again over the last 15 years and I’m familiar with them, I do all my audio work on Macs. So when RAP Editor Jerry Vigil invited me to review a multitrack editing package from German manufacturer SEK’D that runs under Windows, I gathered my courage, rented The Empire Strikes Back, and prepared for a journey to The Dark Side...
Nah — just kidding. This stuff is great! The box that arrived on my doorstep included Samplitude Studio version 5.5 and the company’s PRODIF PLUS sound card. First, we’ll install the sound card into the old Dell PC.
 CARD TRICKS
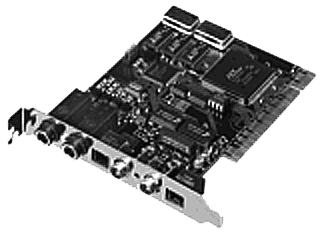
The PRODIF PLUS audio card is a short PCI card, with both analog and digital I/O (figure 1). The analog input and output are unbalanced on two stereo phone jacks, with the left channel on the tip, the right channel on the ring, and ground on the sleeve contact. Analog input sensitivity can be set via jumpers to either -10dBv or +4dBv. The level of the analog outputs is adjustable in software, in increments of 0.5dBv. The resolution of the AD and DA converters is 20 bits and they will handle sample rates from 11.05 to 48 kHz.
The card supports several digital formats. S/PDIF and AES/EBU in and out are available on RCA jacks, and there are also two optical jacks that will handle either stereo S/PDIF or eight-channel ADAT format digital audio. Supported sample rates include 32, 44.1, 48, 64, 88.2, and 96 kHz, and the digital I/O accepts bit rates from 8 to 24 bits.
I like the fact that the optical jacks support both S/PDIF and ADAT formats transparently. However, I was concerned about using AES/EBU on an unbalanced RCA connector, but I was able to record and playback DAT tracks using simple XLR to RCA adapters and short cables. For longer cable runs of AES/EBU, I’d recommend using 110/75 ohm transformers made by Canare (www.canare.com) and others.
The PRODIF PLUS package includes the PCI card, a manual (in German, French, and English), and floppy disks with drivers for Windows 95/98 and NT. Installing the card was a breeze — Windows 98’s Plug and Play feature found the card right away and prompted me to install the driver from diskette. With all the horror stories I’ve heard about IRQs, slot conflicts, and “Plug and Pray,” this part of the process was surprisingly simple. Whew!
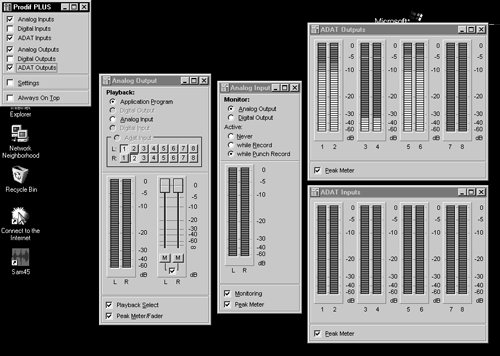
Once installed, the driver puts an icon in the control panel section of Window’s task bar. Clicking on this icon brings up the PRODIF’s configuration windows (figure 2). Clicking on the check boxes in the PRODIF PLUS window activates the various I/O options, and opens the associated meters in separate windows. Besides being fun to watch, the meters would be useful for troubleshooting and seemed accurate.
Although you can’t use the ADAT interface and the S/PDIF or AES/EBU connectors at the same time, using the ADAT interface and the analog inputs together lets you record up to 10 tracks at once.
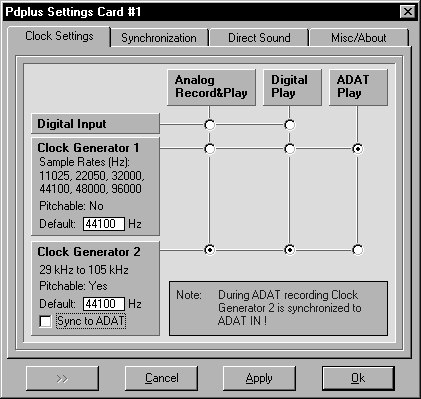
Clicking the SETTINGS checkbox (figure 3) lets you choose digital clocking options. The PRODIF PLUS card has two internal clocks, or you can clock it from your digital audio source. This stuff is important if you’re working with digital sources and master recorders, and it’s nice that SEK’D provides a straightforward interface for choosing amongst a lot of options.
INSTALLING SAMPLITUDE
Samplitude Studio is a multitrack recorder, editor and mixer. It will handle up to 999 tracks, performs true non-destructive editing, and includes a mixer with real-time effects, EQ and dynamics.
Samplitude Studio requires a PC with at minimum a Pentium 166 processor, plus a CD-ROM and floppy drive. It runs under Windows 95/98 or Windows NT, and wants to see a minimum of 16 MB RAM (32 for Windows NT). However, the number of effects and tracks you get is directly proportional to the power of your computer, so you want a fast machine and lots of memory. I evaluated Samplitude using the PRODIF PLUS card, installed in a Dell OptiPlex with a 500MHz Pentium III, 256MB of RAM, and a 20 GB EIDE hard disk. This computer proved more than adequate for Samplitude.
The package includes a CD, a floppy disk for authorizing the program, and a 290-page manual, which is conveniently wire-bound so it always lays flat. This is a small thing, but it becomes very important as you start working with the software. You’re gonna need the manual close at hand. Samplitude is a powerful program, but it is not especially easy to learn.
Installation was simple, once I figured out which file was the installer. The CD includes a large number of audio examples and a two-part video tutorial, and I highly recommend installing all of those with the program. They’re essential to help you get the most from the software.
THE BIG PICTURE
When you first start Samplitude, you’ll find yourself looking at the VIP (Virtual Project) screen (figure 4). This is where all the recording and editing action takes place. Although it can be a bit intimidating at first glance, once you’ve looked at the video and skimmed the start of the manual you’ll have a good grasp on things.
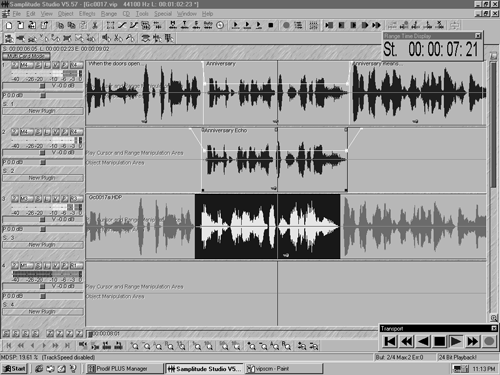
Of interest are the seven buttons next to each track. They are, from left to right, a Track Properties button that yields general information, a Mute button that when right-clicked lets you assign the track to a particular output, a Solo button, a Lock button that locks the track in place, a Volume curve button that when activated lets you draw custom volume graphs, a Pan curve button that works like the volume curve, and a Record enable button. Right-clicking the Record enable button lets you choose which audio input will be recorded on that track.
Below these are level meters and sliders that control the overall volume and panning of the track. Beneath the sliders is a “slot” that allows you to assign a DirectX plug-in to that track.
Along the top of the screen you’ll find the iconic toolbar. You can add, remove, and rearrange the icons on the toolbar to have it display the exact functions you want. A helpful feature is the label that appears if you leave the cursor over a particular icon.
The “S” and “Z” buttons along the bottom of the screen let you store and recall various position and zoom levels for easy recall. The other icons on the bottom of the screen move the screen left and right by various distances. While I understand their function, I found them less-than-useful in navigating forward and backward through a track. I prefer to use the scroll bar, or better yet the arrow keys on the keyboard.
VIRTUAL PROJECTS
A Virtual Project is composed of one or more “physical” projects, or sections thereof. The advantage to this system is that you can do any kind of editing you want to a Virtual Project, and it doesn’t change the original sound files. This is true non-destructive editing. For example, if you wanted to have several different mixes of the same set of tracks, you could just create different Virtual Projects. Each Virtual Project could mix and match sections of different tracks, without altering the original track files, or using more hard disk space.
The Virtual Project is the powerhouse of Samplitude. A Virtual Project can have up to 999 tracks, subject to the power of your PC. I was able to create Virtual Projects with 128 blank tracks without incident, although I doubt I could play that many tracks of audio with my PC. I was however able to play a project with 24 tracks of simultaneous audio, which is overkill for radio anyway.
Clips of audio can be arranged on the tracks however you like. These audio clips are considered either “hard-drive” Projects (HDPs) or “RAM” Projects (RAPs), depending on where they are stored, and they are your basic building blocks. They can be recorded right into the virtual project, imported from existing .WAV files, or imported directly from CD. Once a clip is part of a Virtual Project, it’s referred to as an “Object,” and it can be manipulated much like an object in a desktop publishing program. Naturally, you can drag it forward or backwards in time, or from one track to another.
If you click on an Object, it will show 5 little handles. Moving the bottom handle at either the beginning or the end will change the length of the Object. Moving the top handle raises or lowers the volume. The 2 handles in the upper corners are for fades. Pulling one of these handles towards the center creates a fade-in or fade-out from the desired location. All of these changes are part of the virtual project, but the original sound file is not changed.
Although this can be a very efficient way to work, you have to learn how Samplitude works before you can get much done, so it isn’t the kind of program that you install the night before the big deadline. In other words, expect to read the manual. Another thing that makes the Samplitude learning curve a bit long is that they do not adhere to all the standard Windows conventions. Control S saves, but Control O doesn’t open. If you want to cut audio within an Object, you have to use the OBJECT menu instead of the EDIT menu. Some keys do what you expect, some don’t.
A word about keyboard equivalents: if you want to take advantage of Samplitude’s speed, plan on learning ALL the keyboard shortcuts. Shortcuts are a very necessary evil in Samplitude, and they are infinitely faster than using the menu bar with its many submenus. There are over seventy keyboard shortcuts, and once I’d memorized a couple of dozen, the editing process just flew by.
Lastly, you can now import and export MPEG audio directly within Samplitude, if you buy QDesign’s i-Media MPEG Pro software upgrade. The bad news is that the upgrade is $395, which is nearly the price of Samplitude itself.
EDITING EFFECTS
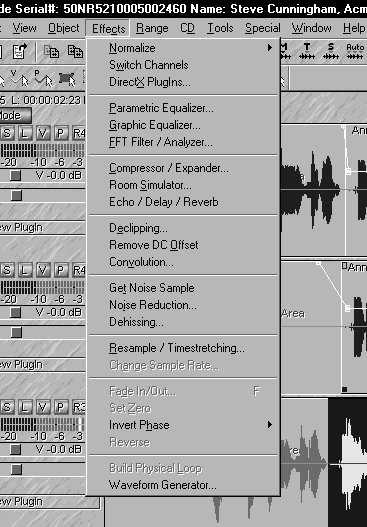
In addition to the usual Cut, Copy, and Paste editing functions, Samplitude offers a host of noise-altering tools under the EFFECTS menu (figure 5). These run the gamut from sensible to completely out-of-control. Sensible effects functions include Invert, Fade, Normalize, Compressor/Expander, Resample, Echo, and Reverb. The EQ department has highpass, bandpass and lowpass filters, a 5-band graphic, and a 3-band parametric.
The Time Stretch effect is one of the better-sounding ones I’ve ever heard. I used it extensively to reduce a VO from 68 seconds to 60 (well okay, I first cut every stinking breath I could find). Even after applying it multiple times, there were no artifacts that I could hear. Impressive.
Convolution is definitely an out-of-control effect in that it uses the frequency and level characteristics of one clip to modulate another in strange ways. Finally, the Noise Reduction and Dehissing effects are good and are quite effective in cleaning up noisy tracks without creating artifacts or trashing the frequency range of the originals.
In addition to the many effects included with the program, Samplitude Studio will work with any DirectX plug-in, further expanding your processing options. And while none of these effects are real-time, you have to wait a bit while the software applies the effect to the sound — they all ran quickly on my 500MHz Dell.
MIXING IT UP
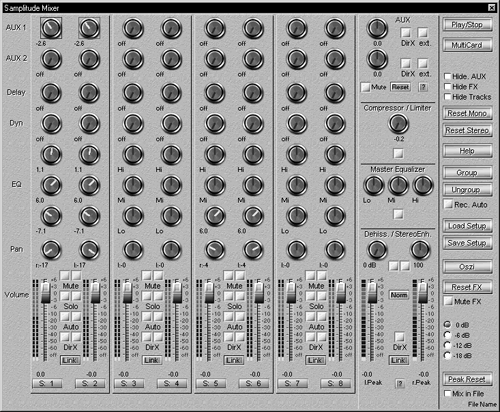
Samplitude’s mixer offers the opportunity to apply effects to your tracks as well, but here the effects are all real-time (figure 6). Arranged as channel strips, a master section, and a column of buttons and options, the mixer can be manipulated while audio is playing. The channel strip area displays up to eight channels at a time, and you can scroll it to see more.
From the top, each strip features two AUX sends that can route the signal internally to a DirectX effects device or to an external effects device. This is where Samplitude’s ability to address multiple sound cards comes in handy, and that’s the purpose of the MultiCard button on the right.
Next comes a DELAY knob that can apply a multitap echo to the channel, and then there is a DYNAMICS knob that controls a real-time compressor/limiter/gate. The EQ is three band and fully parametric, and you can access the frequency and Q controls by right-clicking on an EQ knob. Finally each channel strip has Pan and Level controls which can be automated, along with Solo and Mute buttons.
The master section contains the master AUX sends, a master Compressor/Limiter, master EQ, and a master Effects section. The master Effects include the aforementioned Dehisser, and a Stereo Enhancer that gently messes with midrange frequencies to create a larger perceived stereo spread.
The buttons along the right are mostly self-explanatory, with the exception of the OSZI button, which opens the Oscillator/Stereo Correlator window. This feature is great for checking the phase of your stereo tracks to make sure they’ll play properly in mono.
All of these effects and processes can be saved as a setup, and recalled at any time. And since they all work in real-time, you can really tweak your tracks to perfection without changing the actual audio files stored on the hard disk.
BURNING A CD
Samplitude Studio Version 5 includes integrated real-time CD burning right from within the application. SEK’D have integrated their Red Roaster CD mastering software into Samplitude, and it makes the process very simple.
Once you’ve edited your spot and applied any effects or dynamics you want in the mixer, you simply select a range that includes all your tracks. Then go to the TOOLS menu and select TRACK BOUNCING. Name your bounced file, click OK, and Samplitude will write a new file to disk that will include all your edits and mixer effects.
To finish the process, you create a new 2-track Virtual Project and import your bounced file. You can now insert track index markers (also known as PQ codes) into your file if you wish. Then put a blank CD in your burner and click on the MAKE CD icon in the toolbar. Choose a write speed compatible with your CD burner, and off you go. That was easy, and we didn’t even have to switch to another program.
NEW IN VERSION 5.5
Other notable features in the latest version of Samplitude Studio include Track Speed, which trades off additional RAM use to deliver more tracks, and the ability to create asymmetrical crossfades. In addition, a new display option actually scales the waveform display by Fade In/Out or Volume curves, which lets you actually see the volume level represented by the height of the waveform.
Samplitude Studio also includes MIDI capabilities with version 5.5, and it works with MIDI in the same manner as it works with audio. Of course, you’ll need a sound card that includes MIDI or a separate MIDI card to take advantage of this, and the PRODIF PLUS does not offer MIDI. But SEK’D makes sound cards that do, including its new Siena card ($699).
HOME STRETCH
Samplitude Studio is a strong editing program, and the PRODIF PLUS card is a solid performer. The tool set provided by SEK’D is comprehensive and complete, and they’ve done an excellent job of providing a stable and fast workstation that will run on relatively inexpensive computer.
My only quibbles are with the non-standard commands found in some areas of the program, and with its steep learning curve. But at no time during my evaluation did I experience a freeze or crash of any kind. The closest I came to that was when I tried to change the clock rate while the program was running, and it presented me with a dialog box in German. Thank goodness for my Berlitz dictionary, and I dismissed the box and kept going without incident.
Samplitude Studio and PRODIF PLUS card is a solid combination for production, with more tools and goodies than you’ll probably ever need.
Samplitude Studio carries a suggested retail price of $499, and the PRODIF PLUS card retails for $599. For more information in the US, contact SEK’D America at 800-330-7753. For more information worldwide, visit www. sekd.com.
♦

