by Steve Cunningham
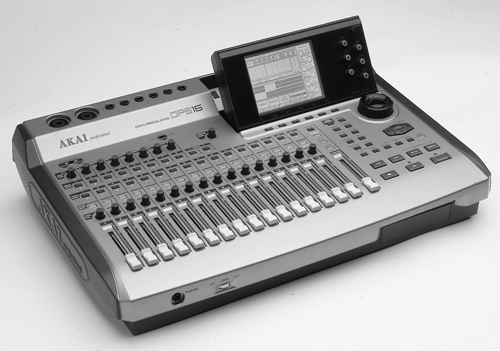
The first of the new 24-bit, 96 kHz digital audio recorders are now upon us. Akai’s latest entry in the 24/96 category is their DPS16 Digital Personal Studio. Although it’s primarily designed for project studios, the DPS16 has the features needed for producing spots, liners, and promos in a small and inexpensive package. It’s laid out like their DPS12, but on steroids, and the interface is much more direct.
The DPS16 is a 16-track random access hard disk recorder and editor that records linear digital audio at either 16- or 24-bit resolution, at sampling rates of 32, 44.1, 48, and 96 kHz. To ensure lots of digital headroom, all internal data paths in the DPS16 are 56-bits wide, to handle 24-bit audio cleanly. It comes standard with a 10 GB IDE hard disk built-in, and a SCSI connector for adding external hard disks.
It also has a 26 channel digital mixer with scene memory, three-band digital EQ on every channel, and a built-in four-channel effects processor with lots of presets. There are also four aux busses that can be routed to the internal effects processor or out the back to external processors.
All this digital processing is housed in a silver package with a large backlit LCD display that tilts for easy viewing. The unit is about 19" wide, so it takes up very little desk space.
THE FRONT PANEL
The DPS16’s front panel is definitely where the action is, starting with the backlit LCD display. It’s big, informative, and easy to see thanks to the tilt feature and to the contrast control. Below the display are six soft keys whose functions change depending on what you’re doing. To the right of the display are six soft knobs (Q-Link knobs) that provide real time control over channel EQ, aux send levels, or effects parameters. Below the soft keys are a series of Mode buttons that let you access record, edit, mix, and effects functions with a single button press.
Akai calls this interface Q-Link Navigation. They’ve designed it such that you’re never more than one button away from any major function. The soft keys’ labels change according to the Mode buttons, and it all works together to make the DPS16 easy to get around on. That’s a good thing, because the pre-release unit I had came without a manual. But so far I haven’t needed a manual, which says a lot for the straightforward operation of the DPS16.
There’s a jog/shuttle knob that comes in the familiar ring and center-wheel configuration, and below that is a cursor control for tabbing through the fields on the screen. Below that are six buttons that assign Edit In and Out points, and that play between, to, and from the In and Out points.
Also in that row is the all-important UNDO button. The DPS16 has up to 250 levels of UNDO, and you can set the number of UNDOs you want as a user preference. While it’s impressive to have 250 levels of UNDO, those of us who can’t remember what we had for dinner last night will want to set the number of UNDO levels to something more reasonable, like three or four.
Rounding out the right side is a full set of transport controls, including MEMORY and GOTO buttons which set and recall locate points, respectively. You can program up to 100 locate points within a single recording, and can even name them.
The left and center of the front panel is dominated by the 16 100mm faders and their associated panpots. Next in line are the RECORD SELECT buttons, the TRACK SELECT buttons, and the INPUT SELECT buttons. At the top are the eight balanced analog inputs, two of which are on Combo jacks that accept either XLRs or 1/4" phone plugs and feature mic preamps with phantom power. Input number eight can be switched to handle a low impedance source like electric guitar or bass, and all eight analog inputs have 24-bit converters. If you use the two channels of digital input on the back panel, you can record up to ten channels in one pass.

THE REAR PANEL
Leftmost on the back panel is the power switch and AC receptacle. To the right of that is a footswitch input that accepts a momentary contact closure. This can be programmed for punch-in and -out or for play and stop. The external SCSI connector is next, and you may need to buy an adaptor for it as it’s the high-density 50-pin variety. You don’t see this connector often, but I had no problem finding an adapter at CompUSA.
Next come the MIDI jacks, one for MIDI IN and the other for either MIDI OUT or MIDI THRU. Further to the right are the digital I/O connectors, which are IEC-958 Type II (S/PDIF) on RCA connectors. There are four aux sends on 1/4" unbalanced phone jacks.
The Master Out and Monitor Out are also on unbalanced RCA jacks. They’re both fed by the main stereo bus, but the Monitor Out has a separate volume knob on the front panel.
I’M IN THE MODE FOR SCREENS
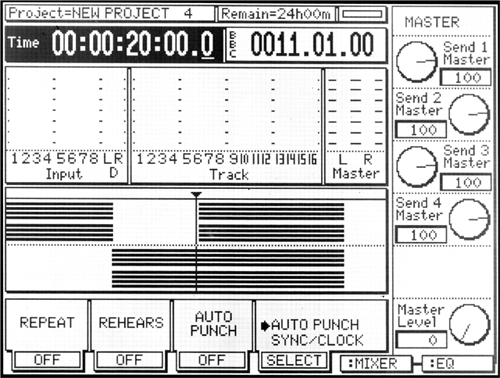
When first powered on, the DPS16 goes through its diagnostic routines and lands on the MAIN SCREEN with the last project used (if any) loaded and ready to go (see figure 1). The MAIN SCREEN is the home page of the DPS16, and as such its Mode button has blue screened around it.
Thanks to the large display, the DPS16 lets you see both input and track meters in nearly all Modes. They appear in the top half of the display along with the counter, which displays time in an hours:minutes:seconds:frames format. Also on the top is a counter that works in bars and beats, the project name, the remaining recording time of the disk, and a little bar graph that shows the amount of disk activity.
Below the meters is a graphic representation of 16 audio tracks, with a NOW line in the center. Hitting PLAY will cause the tracks to move from right to left past the stationary NOW line, much like tape moves past the play head.
On the right side of the display is a graphic representation of the controls that are connected to the six Q-Link knobs. In this example the Q-Link knobs are set to control the aux send levels. Along the bottom are the softkey labels. Pressing the rightmost softkeys (F5 and F6) lets you change the function of the Q-Link knobs to control channel EQ or effects parameters as well.
Like most digital mixers, you first select a channel and then tweak using the Q-Link knobs. For example, to adjust the aux send levels on mixer channel 5, you would press channel 5’s TRACK SELECT button, then use the Q-Link knobs to make the adjustment. The field above the onscreen knobs would change to read CHANNEL 5 instead of MASTER as in figure 1, so it’s easy to keep track of which channel you’re working on.
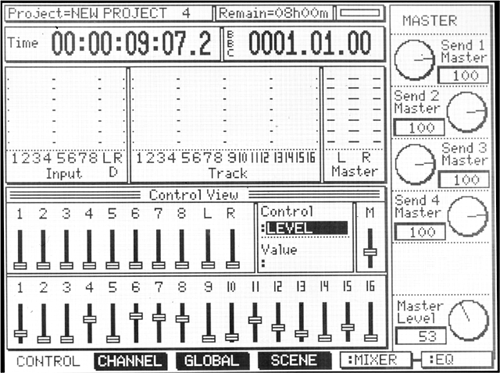
Pressing the Mode button labeled MIXER lets you see a representation of the digital mixer, with the meters remaining in the upper half of the screen (see figure 2). In this figure, the 16 faders that control hard disk tracks are on the bottom, and above them are the faders that control the ten inputs, with the ones labeled L and R being the digital inputs. By turning the jog wheel you can scroll through all the settings for fader levels (shown), panpots, EQ, aux levels and pans, and channel mutes.
Of interest is the 3-band 56-bit digital EQ, which is configured as sweepable, low-shelving, and high-shelving, and a fully parametric mid-band. Like most digital mixers, the frequency controls are stepped, but all three bands have 128 steps per octave. This is as fine a resolution as you’ll find on many expensive digital consoles, and is more than enough control to isolate a problem frequency.
Pressing the CHANNEL softkey (F2) lets you see all the EQ settings for a single channel at one time on the screen. Again, to see a different channel’s settings, you just press a different TRACK SELECT button. Pressing the SCENE softkey (F4) lets you store and recall all the mixer parameters in one of 26 scene memories. Handy stuff.
PATCH ‘EM, TONTO
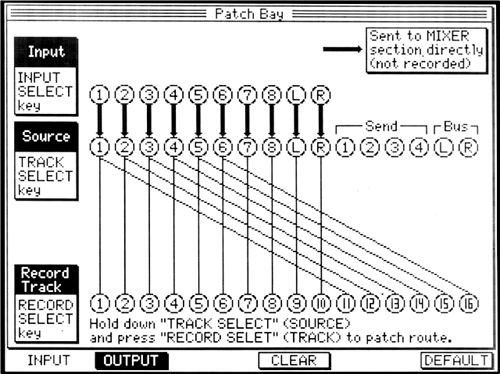
My favorite feature of the DPS16 is the virtual patch bay you access with the PATCH button (see figure 3). This graphical representation of a patch bay lets you see exactly where each input and output is going. If you have your VO mic plugged into input 1 to use the mic preamp, but you want to record on track 5, you simply press and hold the TRACK SELECT 1 button, and then press the RECORD SELECT 5 button. The screen will immediately reflect your action by drawing a line between the Source 1 and the Record Track 5 circles.
Wanna use the digital inputs to bring in a music bed from CD and record on tracks 1 and 2? Simple — press TRACK SELECT L and then RECORD SELECT 1, let go, then press TRACK SELECT R and then RECORD SELECT 2. You’re done, and you can easily see it on the screen. It’s very slick.
Pressing a input’s INPUT SELECT and then a TRACK SELECT will send that input directly to the mixer’s stereo bus. The heavy black line between Input and Source will disappear, and will be redrawn going from Input to the “Sent to Mixer” box in the upper left. This is useful for monitoring tracks that you don’t want to record at all, or for bringing in additional audio sources at mixdown time.
To reset the patchbay to its default configuration (shown), you just press DEFAULT (F6). To clear all connections and start from scratch, just press CLEAR (F4). The DPS16’s virtual patchbay is by far the most clear and concise representation I’ve seen on any digital mixer, and makes repatching an absolute breeze.
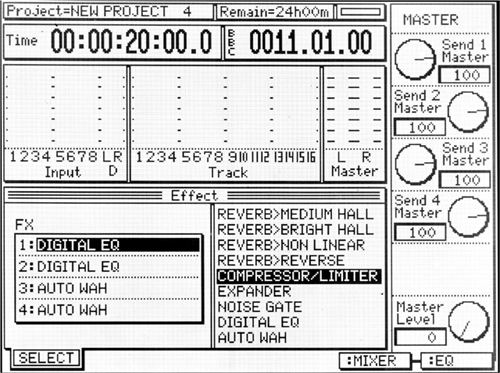
Assigning effects in the DPS16 is equally simple. Pressing the Mode button labeled EFFECTS brings up a screen that shows the four channel processor on the left, and the available effect presets on the right (see figure 4). You turn the jog wheel to choose an effect from the list, and press SELECT (F1) to assign it to the current processor channel. You can configure the processor as four mono effects, as two monos and one stereo, or as two stereo effects. The four channels are connected to the four auxes by default, and return via Inputs, so you can easily record tracks wet, or record the effects on their own tracks and mix them later.
There are 44 separate effects available, including 8 different reverbs, a pitch corrector, an exciter, and a whole slew of phasers, flangers, filters, choruses, and echoes. The effects also use 56-bit digital words, and their sound quality is excellent.
EDITING TRACKS
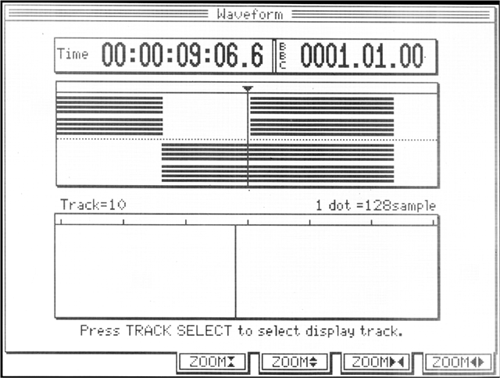
Once you’ve recorded a VO read and a music bed in the DPS16, you’ll want to edit them. The Mode button labeled WAVEFORM brings up the Waveform
screen (see figure 5). It shows you all 16 tracks on top, and any one individual track on the bottom. To view a particular track, you press the desired TRACK SELECT button. At this point you can use the jog/shuttle wheel to scrub through the track and find your edit points.
Editing on the DPS16 is just like editing on tape. You find an edit-in point, and set it by pressing and holding MEMORY then pressing the IN button, both of which are located above the transport. You set your edit-out point in the same fashion. You’ll then see the edit area highlighted in the track area in the upper part of the screen.
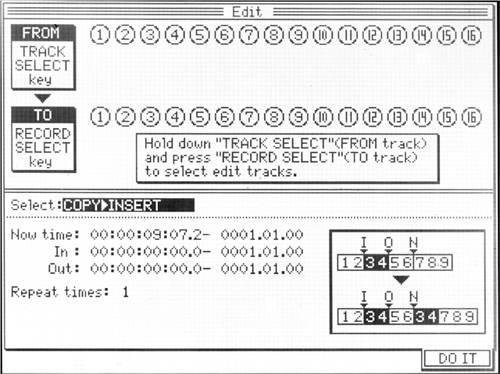
Once that’s done, you press the Mode button labeled EDIT to select an editing operation (see figure 6). Turn the jog wheel to select what kind of edit you want to use, and choose the tracks you wish to edit using the corresponding TRACK SELECT and RECORD SELECT buttons. Press DO IT (F6), and it will.
There are several different types of cut/copy/insert edits from which to choose. The lower right corner shows a graphical picture of the edit you’ve selected, with labels for In, Out, and Now. In the example shown, the audio between the IN and OUT points will be copied and inserted at the NOW point, without overwriting the existing audio.
The DPS16’s edit functions include time compression and expansion. You can stretch part of a track and overwrite later audio, or stretch it and have it move later audio forward in time to fit. At reasonable levels of time compression or expansion (10% or less), the result is transparent, and it’s a real lifesaver for producing spots that have to be exactly :30 or :60.
When you’re finished with your project, you can back up the entire business to a CD-R or CD-R/W. The backup function stores all your tracks, edits, mixer scenes and settings, the whole shebang.
You can also mixdown to two tracks using the DPS16’s internal stereo bus. This bus doesn’t connect to the master outputs, and is designed expressly for mixing down to two without leaving the digital domain. Once mixed, you can assign those mix tracks to an external CD-R or CD-R/W and burn a CD. Cool.
IN USE
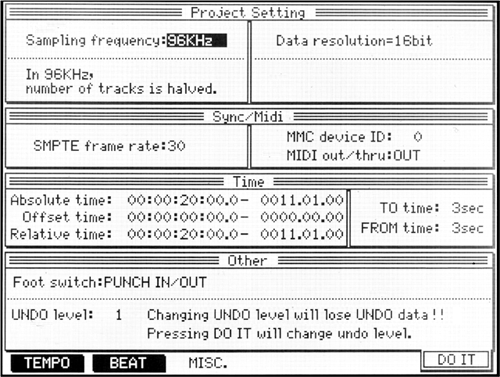
To begin a new recording, press the Mode button labeled PROJECT to create a new recording (see figure 7). Here’s where you’ll select the sample rate and quantization resolution, as well as UNDO levels and offsets. Pressing DO IT (F6) will take you back to the MAIN SCREEN, and you’re ready to record.
Note that when working at a 96 kHz sampling rate, the DPS16 becomes an 8 track recorder, since the additional data is stored on tracks 9 through 16. But at 32, 44.1, or 48 kHz sampling, it’s a full 16-track machine at both 16- and 24-bit resolution.
The DPS16 also has 250 virtual, or storage, tracks. These can be used for alternate takes, and you can assign any virtual track to playback via any mixer channel. For example, I recorded a VO take to track 1 via mixer channel 1. Then I assigned a blank virtual track to mixer channel 1, and recorded another take. I did four of these, and then assigned each take to a different mixer channel, so I had take 1 under fader 1, take 2 under fader 2, and so on. At that point it was easy to cut and paste between them to yet another track and get a good composite VO read.
During the four weeks I had the DPS16, I recorded a wide variety of material on it, including male voice, female voice, and even an upright bass. I used several different mics, both expensive and cheap. I recorded at both 24-bit and 16-bit, and at each of the different sample rates.
This box sounds “really” good.
It sounds so much better than some of my other recorders, including my DAT, that I re-recorded a couple of times thinking something was amiss. It wasn’t. So then I tried comparing recordings at various sample rates and resolutions to see if that would account for it.
I heard the most difference between recordings done at 16-bit and recordings done at 24-bit. It wasn’t hard to tell which was which, as the 24-bit recordings were cleaner and more open-sounding. But even 16-bit, 44.1 kHz recordings on the DPS16 still sounded better than anything else in my room.
While I heard a clear difference between the 16-bit recordings and the 24-bit recordings, the difference between 96 kHz and either 48 or 44.1 kHz was subtle to the point of vanishing. And 96 kHz used up a lot of disk space to boot. Why doesn’t it sound twice as good at twice the sampling rate? That was a real head-scratcher.
Then it hit me — it doesn’t matter. 96 kHz doesn’t matter, at least not to me.
What does matter is the quality of the new 96 kHz converters. I’m convinced that the A/D and D/A converters in the DPS16 are so much cleaner than the converters in, for example, my Panasonic 3700 DAT that even regular old 16/44.1 stuff just sounds better. A tip of the hat to the chip manufacturers is in order here, as is one to Akai for using their converters.
Am I gonna sell everything and buy new? No. But based on what I’ve heard, any new gear in my room will have 96 kHz converters on it. Why not?
WRAP IT UP
The DPS16 packs a whole lot of power into a small package. I do have some quibbles with it. The plastic case looks great, but feels a bit less than pro. Likewise for the plastic 1/4" jacks. And while the large LCD screen is great, the PROJECT screen in particular is cluttered and tough on these old eyeballs.
But those nits aside, it’s a capable box that includes all the tools. It sounds fabulous, and it’s straightforward enough that I’d even trust a morning guy to use it. Well, perhaps I’m being naive... let’s just say it’s easy, and with a street price that should be about two kilobucks, what’s not to like?
The DPS16 should be on store shelves as you read this, and carries a suggested retail price of $2795. For more information, contact AMIC at (800) 433-5627, or visit www.akaipro.com.
♦

