By Steve Cunningham
It’s the non-linear editing giant. It’s the eight-hundred-pound gorilla of digital audio. Yup, it’s Pro Tools from Digidesign, and until recently, it was expensive. A full-blown Pro Tools system was a year-worth-of-mortgage-payments expensive. But that’s all changed with the introduction of the Digi 001 recording and editing system. Today, if you have a fast computer and a little less than a kilobuck, you can run with the big dogs.
Building on the tradition of Pro Tools software, the 001 system is designed to have all the connectivity and audio power required to turn your Pentium or Power Macintosh computer into a complete studio that can record, edit, mix, and process digital audio. Just add a microphone, maybe a CD player, and a pair of powered studio monitors, and you have a rig that will produce commercials, promos, and IDs all day long. Digi 001 session files are compatible with full Pro Tools sessions, so you can even collaborate with the likes of Eric Chase!
However, you should be prepared to upgrade or replace your computer if it’s much over a year old. The reason for this is that the 001 is a “native” system — that is, it uses the computer’s CPU for everything, including reading and writing audio data to hard disk, changing volumes, pans, and EQ, adding reverb or other effects, drawing the screens, and responding to the keyboard and mouse.
The computer requirements for the 001 are stiff — for the PC, Digidesign demands at minimum a Pentium II at 300 MHz or better, and recommends a 500 MHz Pentium III machine, running Windows 98 (the K6 processor is specifically not supported). For the Mac, Digidesign supports a Power Mac 8600 or 9600 at 200 MHz or better, and it strongly recommends a B&W G3 or a G4, all with System 8.6 or better. The 001 also needs a minimum of 128 MB of RAM and prefers 192 MB on either platform. Finally, Digidesign recommends that you have a separate and fast SCSI or IDE hard disk for storing digital audio. That probably means investing in another hard disk and perhaps a separate SCSI accelerator card.
 THE HARDWARE
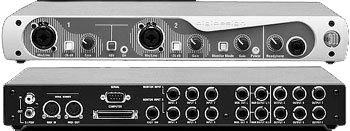
The 001 hardware consists of a PCI card, a rack-mountable I/O interface box, and a cable to connect the two. The PCI card has a multi-pin connector to attach it to the interface box, as well as optical in and out connectors. The optical ports can carry either eight-channel ADAT lightpipe or stereo optical S/PDIF format digital audio.
The front panel of the interface box features two channels of analog audio input on combo connectors that will accept either XLR or 1/4" inputs. The inputs can accept line or mic level signals, and a 26 dB pad is provided, as is switchable phantom power and a gain knob. The software allows you to apply a 60 Hz highpass filter to these inputs. The right side of the front panel sports the headphone jack and its associated volume control. Next to the headphone section is the Monitor Mode switch, which allows a stereo audio signal to be routed through the interface box even when the computer is turned off — a nice touch. Rounding out the monitor section is a volume knob and a power-on LED.
Speaking of power, the 001 interface box has no power cord or wall-wart. It draws its power from the PCI card through the multi-pin connector. That means one less cable to deal with and one less outlet to find on a crowded power strip.
The rear panel is chock-full of gozintas and gozoutas. Inputs include another six analog ins on balanced 1/4" TRS jacks, which combined with the two on the front give a total of eight analog inputs. There are also eight analog outputs on the same balanced 1/4" TRS jacks, and two separate “monitor outputs” with like connectors. The monitor outputs play the audio that is routed to analog outputs 1 and 2, and their volume level is controlled by the monitor volume knob on the front panel.
All input and output converters on the 001 are 24-bit. Analog inputs and outputs are factory calibrated at a -14 dB nominal level, referenced to a full code signal. This means at the nominal reference input level (+4 dBu or -10 dBV) you can have up to 14 dB of headroom before input or output clipping occurs. You can adjust the input sensitivity in software. There are no hardware meters or clip indicators on the interface box, but that’s not a big deal since the software provides level meters.
The rear panel also provides S/PDIF digital in and out, on RCA connectors. The S/PDIF outputs can mirror the main analog outputs for recording to DAT, or can operate independently for use with external digital effects. Rounding out the rear panel is a footswitch jack for controlling punch-in and -out, the multi-pin connector for attaching the interface box to the PCI card, and MIDI In and Out connectors.
The hardware of the 001 is handsome and well-designed, but not without compromise. One such compromise is that the interface cable is only six feet long, which means that the interface box will need to be located fairly close to the computer. This may or may not be convenient when you consider fan noise and hard disk noise. Another complaint is that the ADAT optical I/O is on the PCI card, which means that the ADAT connectors aren’t in the same place as the analog and S/PDIF connectors. While annoying, I didn’t find either of these issues impossible to deal with.
INSTALLATION
The Digi 001 comes complete with an illustrated System Installation Guide, which walks you through the process and explains how to connect the 001 for use with a mixing console or without. It also explains how to install the Pro Tools LE software, and provides brief introductions to hard disk recording, MIDI, OMS (Opcode Music System, part of the MIDI functionality of the 001), and Pro Tools LE.
The hardware installation was nearly painless. I opened my Power Mac 8600/300 and popped the PCI card into an open slot. I connected the interface cable between the box and the PCI card, and I was good to go — almost.
As part of the software package, Digidesign provides a utility called DigiTest, that exercises the 001 PCI card and any other SCSI cards you may have installed. In my case the test first refused to run, complaining that “The System is Misconfigured.” Hmmm, what the heck does that mean?
Holding the Command key down while re-running the test allowed it to complete, and showed that the 001 PCI card was just fine. However, DigiTest complained about where my SCSI card was installed. Opening the Mac again and switching the SCSI PCI card and the 001 PCI card fixed the trouble, although I still don’t know how or why.
Here’s something I appreciated — Pro Tools LE doesn’t require a floppy “key disk” for authorization. You simply type in an authorization code when the software first runs and you’re happening, assuming you also have the correct hardware installed.
THE SOFTWARE
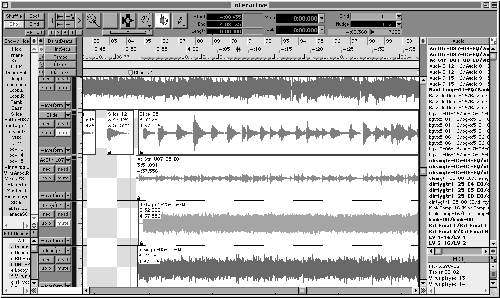
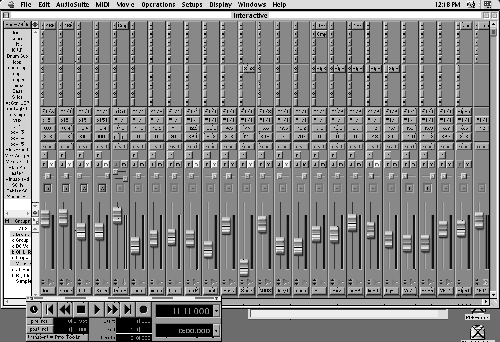
Although it provides a lot of features, Pro Tools software has always been relatively easy to use. If you have even a passing familiarity with a mixing console and multitrack tape recorder, you should be able to jump right in and get to work. If you’re already a Pro Tools maven, then you’ll feel right at home with the LE version. Some key command equivalents have changed, such as which keys are used to select the edit tools, and it would be nice if you were given a choice of the old key commands or the new key commands, perhaps as a preference setting. If you’re new to Pro Tools, take a look at figures 2 and 3. These are the Edit and Mix windows respectively, and this is where everything takes place.
Besides displaying waveforms for each of your audio tracks, the Edit window has four panes along its left and right sides (figure 1). The upper left pane lets you show or hide specific tracks, while the lower left pane lets you group tracks for editing and select them with a single click. The upper right pane shows a list of all audio clips available to your recording, whether they’ve been assigned to a specific track or not. To assign audio to a track, you simply highlight it in the list and drag it onto a track. Finally, the lower right pane lets you do the same with MIDI tracks.

The Edit window provides lots of useful and practical features, such as a Smart Tool that switches what it does depending on where the cursor is located (see figure 4). For example, when the cursor is near the end of a region of audio, it becomes a Trim tool. When it’s in the upper corners of a region, it becomes a Fade/Crossfade tool, and so forth. Several of the editing tools have expanded modes of operation. For example, the Pencil tool can now be used to edit automation data in addition to editing waveforms at the sample level. It can be constricted from freeform drawing to straight lines and random data entry. The Grabber tool (that’s the hand) can be used to move audio regions, or in a new mode it can separate and drag a selected region to another location on a track.
Getting around your recording in Pro Tools’ Edit window is easy, thanks to the program’s highly developed Memory Locations feature. Not only can marker locations be memorized and recalled, much like using locate points on a tape machine, but you can also store zoom settings, track heights, and lots more. If you’re working on one part of a promo and use a marker to jump to another part, the program will instantly resize the tracks, zoom in, and make other changes so you’re immediately ready to work.
Most of the program’s features work in real time, as the program is playing, and the program will play in the background if another application is active on your computer.
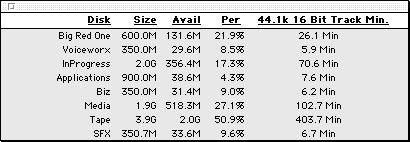
The software supports 24 tracks of audio at either 16- or 24-bits, and at sample rates of 44.1 or 48 kHz. That 24-track limit is a brick wall; there are no virtual tracks available on the 001. Further, muting tracks does not lighten the load on the CPU. The muted track continues to use resources, but you just don’t hear it. There are system performance meters you can use to see how hard your CPU is working. Unfortunately, those meters are located in the Automation Enable window, which makes little sense to me, but at least it’s available. Also available is a Disk window that keeps you informed as to how much disk space you have remaining (figure 5).
The Transport control window serves a number of different functions (see figure 6). The left side contains the transport controls, pre- and post-roll settings, and selection settings. The right side features the main and sub time displays, and several MIDI-specific controls including click on and off, MIDI merge on and off, and several MIDI tempo controls.

The Mix window works very much like a hardware mixer, and everything can be automated. You make changes using the mouse, or you can control the parameters using an external MIDI fader box.
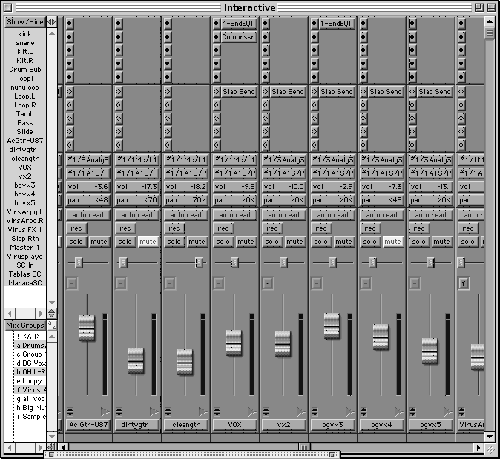
The Mix window is laid out in a similar manner to the Edit window, with two of the four same panes (figure 7). Each channel strip contains, from the top down, five inserts for effects plugs, five aux sends, an input routing button, an output routing button, displays for volume and pan, an automation mode button, and buttons for record enable, solo, and muting. Rounding out the channel strip are the pan and fader, a level meter with clip indicator, a button for grouping faders, and a track label at the bottom.
Pro Tools LE also includes a basic MIDI sequencer. If you work with samplers or MIDI keyboards, this will be an added benefit to you. The sequencer is well integrated into the program, and it’s definitely powerful enough for those who occasionally compose for commercial spots or promos.
PLUG-INS
When Digidesign introduced the 001 and Pro Tools LE software, it also introduced yet another plug-in standard to the world, RTAS (RealTime AudioSuite). While we need another plug-in format like we need consolidation, there’s a good reason for the new format. Digidesign’s original plug-in format, TDM, requires the additional DSP that comes with the bigger and more expensive Pro Tools systems. RTAS plug-ins run on your computer’s CPU, but are compatible with their equivalent TDM plugs. So recordings created in Pro Tools LE can be transferred directly into a full TDM-based Pro Tools system, and vice-versa. When you make that transfer, the software will automatically substitute equivalent TDM plug-ins for any RTAS plug-ins you may be using. So if your recording uses an RTAS D-Verb plug-in and you move it to a TDM Pro Tools rig, the recording will open with a TDM D-Verb plugged in and ready to go. Automation data also transfers directly.
There are several plug-ins bundled with the system, and they cover all the basic functions — dynamics (compressor, limiter, gate, expander/gate), EQ (one and four band parametrics), delays (short, slap, medium, long, all with modulation), dither, and more. They even included a signal generator plug-in, which is nice for troubleshooting and setting up mixer routings. Also included are some non-realtime AudioSuite plug-ins, including invert, reverse, DC offset removal, time-compression/expansion, and pitch shift.
Plug-in parameters can be automated, and the dynamics plugs include sidechain inputs. Plug-ins can be used either as inserts on a track or in aux send/return busses. Most third-party manufacturers of plug-ins have introduced RTAS versions of their existing offerings, including Waves (see Gold Bundle review, April 2000).
THE MANUALS
The Digi 001 system comes with five manuals. There’s the above-mentioned Quick Start and System Installation Guides, plus a guide to using MIDI control surfaces and a guide to using the included plug-ins. By far the largest of the manuals is the fifth one, the Pro Tools Reference Guide, which weighs in at a hefty 410 pages.
The manuals are generally well-written and well-organized. But there are some inconsistencies in them, owing to the fact that they attempt to cover both Pro Tools 5 TDM and the 001 system. Digi’s writers make an attempt to distinguish which system is being discussed, but it would be nice if there was a dedicated manual for the 001 system. Even the .pdf manuals included on the CD-ROM are combo efforts.
IN USE
I immediately put the 001 system to work, recording and editing several commercial spots, and re-editing a few old ones. This system is very solid. After taking a day or so to learn new commands, I found the software easy to navigate, the functions are accessible, and the interface box worked exactly as advertised. The only software glitches I ran across I was able to trace to errant extensions running on my computer, and in an early case, to an extension I had disabled. I’m most impressed with how stable the system really is.
I’ve written previously about how much I like the new 24-bit converters, and how I really can hear a difference over 16-bit recordings. The 001 does not disappoint in the quality department — the converters are very good, and provide an audible improvement even when recording at 16 bits. And recording at 24 bits, well, that’s just plain wonderful. Yes, the 001 sounds really good.
I have some minor quibbles with the system. You can’t undo audio recording operations. So if I completely flub a take, I can’t simply hit UNDO and start over. I have to select the recording and CUT or DELETE it. That seems a bit silly, and a waste of disk space. The 001 will not let you display its timeline as SMPTE timecode, which is a minor drag for me. However, displaying the timeline in hours, minutes, and seconds works okay for projects that don’t need TC.
Perhaps a more important issue is that there is no upgrade path from an 001 system to a full TDM Pro Tools system. If you want to upgrade, you’ll have to sell your 001 — there’s no trade-up policy. But the price difference is so large that maybe that’s not an issue at all.
So what do you get in a big Pro Tools rig that you don’t get in the 001? Up to 64 tracks, up to 86 virtual tracks, sync to SMPTE timecode, some editing features useful in post-production, and the ability to use more plug-ins at once. But hey, we’re talking RADIO here! Lots of us seldom use more than eight tracks, and our editing needs are relatively simple.
Conclusions? Hey, it’s Pro Tools. For better or worse, it’s the industry standard. And since it now supports Windows 98, it deserves a good look for radio production.
The Digidesign 001 has a suggested retail price of $995. For more information in the US, contact Digidesign at (800) 333-2137. For more information worldwide, visit www.Digidesign.com or www.digi001.com.
♦
